In this tutorial, we will explore how to interface the Mini 5V Traffic Light LED Module with your Remal IoT board (or any other development board), and we will also look at how to write code for this component.
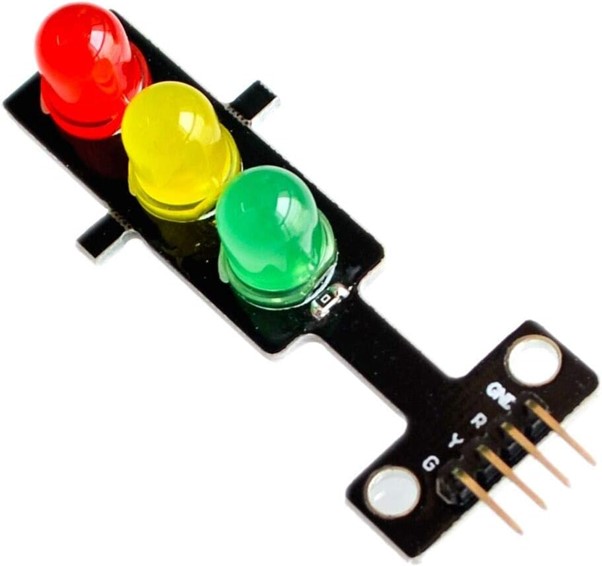
The Mini Traffic Light LED Module is a pretty self-explanatory component. It is a traffic light consisting of 3 LEDs, which are red, yellow, and green. You can write code for the traffic light to control each individual LED by turning it on or off. The lights can be controlled based on a predetermined pattern, or they can be controlled by a different input in your code, depending on how you plan to use the traffic light in your project.
The way the LED traffic light works is simple. It has three pins (R, Y, and G) that you can write to, allowing you to control each LED individually through your code. We will delve into more details regarding this very soon.
In this blog, I will show you how to connect the traffic light module to your board, and I will provide an example code to show you how you can interface the traffic light directly using digitalWrite(). Later on, I will show you how you can make use of the TrafficLight library to simplify the process of controlling the traffic light component and utilize its useful functions for flashing the lights.
Before we proceed any further, make sure you have the following:
In this example, we will be using the Remal IoT Shabakah board. The GND pin of the component can be connected to any GND pin on the board, and the R, Y, and G pins can be connected to any digital IO pins on the board. We will make the following pin connections:
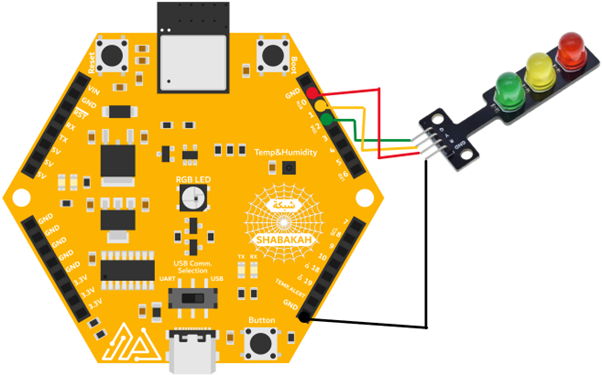
Interfacing the traffic light in your code is simple. You need to set pins 0, 1, and 2 as outputs using the pinMode() function, then you can turn on/off each LED using the digitalWrite() function. This will be demonstrated in the following example code.
					// Define the pins for the red, yellow, and green LEDs
#define R_PIN 0
#define Y_PIN 1
#define G_PIN 2

// Define the time durations for the lights in milliseconds, and the number of times to flash the green light
#define RED_TIME 13500
#define YELLOW_TIME 3000
#define GREEN_TIME 11500
#define NUM_FLASHES 4
#define FLASH_TIME 500

void setup()
{
  // Set the pins as output
  pinMode(R_PIN, OUTPUT);
  pinMode(Y_PIN, OUTPUT);
  pinMode(G_PIN, OUTPUT);

  // Turn all of the LEDs off
  digitalWrite(R_PIN, LOW);
  digitalWrite(Y_PIN, LOW);
  digitalWrite(G_PIN, LOW);
}

void loop()
{
  // Turn on the red LED
  digitalWrite(R_PIN, HIGH);
  // Delay RED_TIME milliseconds
  delay(RED_TIME);

  // Turn off the red LED
  digitalWrite(R_PIN, LOW);

  // Turn on the green LED
  digitalWrite(G_PIN, HIGH);
  // Delay GREEN_TIME milliseconds
  delay(GREEN_TIME);

  // Turn off the green LED
  digitalWrite(G_PIN, LOW);

  // Flash the green LED NUM_FLASHES times, with a FLASH_TIME delay between flashes
  for(int i = 0; i < NUM_FLASHES; i++)
  {
    // Turn on the green LED
    digitalWrite(G_PIN, HIGH);
    // Delay FLASH_TIME milliseconds
    delay(FLASH_TIME);

    // Turn off the green LED
    digitalWrite(G_PIN, LOW);
    // Delay FLASH_TIME milliseconds
    delay(FLASH_TIME);
  }

  // Turn on the yellow LED
  digitalWrite(Y_PIN, HIGH);
  // Delay YELLOW_TIME milliseconds
  delay(YELLOW_TIME);

  // Turn off the yellow LED
  digitalWrite(Y_PIN, LOW);
}
We will start by defining the R, Y, and G pins to make the code easier to read.
					// Define the pins for the red, yellow, and green LEDs
#define R_PIN 0
#define Y_PIN 1
#define G_PIN 2
Because we connected pin R to pin 0, pin Y to pin 1, and pin G to pin 2, we used those values in our defines. However, feel free to change those values depending on how you made your pin connections.
Next up, we defined the different durations we wanted for each light, as well as the number of flashes and flash duration. This has also been done to make the code more readable.
					// Define the time durations for the lights in milliseconds, and the number of times to flash the green light
#define RED_TIME 13500
#define YELLOW_TIME 3000
#define GREEN_TIME 11500
#define NUM_FLASHES 4
#define FLASH_TIME 500
It is important to note that the times are in milliseconds since we will be using the delay() function, which takes the time in milliseconds as an input parameter. Once again, feel free to change these values depending on how you want your traffic light to behave.
Next up, we need to set up the pins of the traffic light as outputs, and then we need to turn of all of the LEDs at the start of our code.
					void setup()
{
  // Set the pins as output
  pinMode(R_PIN, OUTPUT);
  pinMode(Y_PIN, OUTPUT);
  pinMode(G_PIN, OUTPUT);

  // Turn all of the LEDs off
  digitalWrite(R_PIN, LOW);
  digitalWrite(Y_PIN, LOW);
  digitalWrite(G_PIN, LOW);
}
You can see here that we used the pinMode() function to set all of our pins as outputs. After that, we used digitalWrite() to turn off each LED. Writing LOW using digitalWrite() turns off the LED connected to that respective pin while writing HIGH turns on that LED as you will see shortly.
Next up, we have our loop function, which is the main body of our code that will keep repeating.
					void loop()
{
  // Turn on the red LED
  digitalWrite(R_PIN, HIGH);
  // Delay RED_TIME milliseconds
  delay(RED_TIME);
We start our loop function by turning on the red LED. This is done using digitalWrite() by writing HIGH to the R_PIN. After that, we call the delay() function and pass RED_TIME into it. This will cause the program to delay for 13500 ms (the defined value of RED_TIME), i.e. 13.5 seconds.
After that, we turn off the red LED as follows.
					  // Turn off the red LED
  digitalWrite(R_PIN, LOW);
By calling digitalWrite() and writing LOW to the R_PIN, the red LED turns off. Therefore, we turned on the red LED, waited for 13.5 seconds, and then we turned it off. This same way of controlling LEDs will be used throughout this code.
Next up, we do something similar with the green LED.
					  // Turn on the green LED
  digitalWrite(G_PIN, HIGH);
  // Delay GREEN_TIME milliseconds
  delay(GREEN_TIME);

  // Turn off the green LED
  digitalWrite(G_PIN, LOW);
Here, we turn on the green LED, delay for 11.5 seconds, and then we turn it off.
Now, let us try flashing the green LED, in a similar fashion to how a normal traffic light works.
					  // Flash the green LED NUM_FLASHES times, with a FLASH_TIME delay between flashes
  for(int i = 0; i < NUM_FLASHES; i++)
  {
    // Turn on the green LED
    digitalWrite(G_PIN, HIGH);
    // Delay FLASH_TIME milliseconds
    delay(FLASH_TIME);

    // Turn off the green LED
    digitalWrite(G_PIN, LOW);
    // Delay FLASH_TIME milliseconds
    delay(FLASH_TIME);
  }
We will use a for loop to do this. Here, the code will loop 4 times (the defined value of NUM_FLASHES). In the loop, we start by turning on the green LED, then waiting for 500 ms (the defined value of FLASH_TIME), then we turn off the green LED and wait for another 500 ms before repeating the loop again. What this does is cause the green LED to flash on and off 4 times, with the duration of each flash being 500 ms.
Lastly, we want to control the yellow light.
					  // Turn on the yellow LED
  digitalWrite(Y_PIN, HIGH);
  // Delay YELLOW_TIME milliseconds
  delay(YELLOW_TIME);

  // Turn off the yellow LED
  digitalWrite(Y_PIN, LOW);
}
This is done in the same way. We turn on the yellow light, wait for 3 seconds, and then we turn it off.
You can try uploading this code to your board to see how it controls the traffic light. Don’t be afraid of playing with the values of the light and flash durations and the number of flashes in the defines at the start of the code. Modify these defines however you like, and see how they affect the traffic light’s behavior.
Now that you know how to interface the traffic light directly, it’s time to use a library that will make this process much easier. I will be showing you how the TrafficLight library can be used to perform the same simple traffic light pattern as the previous example.
First of all, you need to download the TrafficLight library ZIP file here. Then you need to add it to the Arduino IDE, so you can use it. If you’re not familiar with how to add external libraries to the Arduino IDE, then please check out this other blog which will show you the steps on how to do this here.
If you’ve installed the library and added it to the Arduino IDE, then you are now ready to use it. I will start by explaining how you can use the TrafficLight library and its functions before showing you the example code.
The library allows you to create a TrafficLight object using the following constructor.
					  /**
   * @brief             TrafficLight constructor.
   * @details           Constructs a TrafficLight object and initializes the pin numbers for the red, yellow, and green LEDs.
   *                    The constructor sets the specified pins as output pins, turns off all the LEDs, and initializes the light states to off.
   * @param red_pin     The pin number connected to the red LED.
   * @param yellow_pin  The pin number connected to yellow LED.
   * @param green_pin   The pin number connected to green LED.
   */
  TrafficLight(uint8_t red_pin, uint8_t yellow_pin, uint8_t green_pin);
All you need to do is pass the pin numbers depending on how the traffic light is connected to your board.
Next up, the TrafficLight class contains the following functions: functions to turn off LEDs, functions to turn on LEDs, functions to flash LEDs, as well as functions that tell you whether each LED is on or off.
To turn off an LED, you can call one of the off functions. The library includes the following functions: offRed(), offYellow(), offGreen(), and offAll().
					  /**
   * @brief     Turns off the red light.
   * @param ms  The duration in milliseconds to keep the red light off.
   */
  void offRed(uint32_t ms = 0);

  /**
   * @brief     Turns off the yellow light.
   * @param ms  The duration in milliseconds to keep the yellow light off.
   */
  void offYellow(uint32_t ms = 0);

  /**
   * @brief     Turns off the green light.
   * @param ms  The duration in milliseconds to keep the green light off.
   */
  void offGreen(uint32_t ms = 0);

  /**
   * @brief     Turns off all the lights.
   * @param ms  The number of milliseconds to keep all the lights off.
   */
  void offAll(uint32_t ms = 0);
You can pass a time in milliseconds to these functions, and they will call the delay() function for that time from within the function. If you don’t pass a time, then there will be no delay.
Similarly, you can turn on an LED using one of the on functions. The library included the following functions: onRed(), onYellow(), onGreen(), and onAll().
					  /**
   * @brief     Turns on the red light.
   * @param ms  The duration in milliseconds to keep the red light on.
   */
  void onRed(uint32_t ms = 0);

  /**
   * @brief     Turns on the yellow light.
   * @param ms  The duration in milliseconds to keep the yellow light on.
   */
  void onYellow(uint32_t ms = 0);

  /**
   * @brief     Turns on the green light.
   * @param ms  The duration in milliseconds to keep the green light on.
   */
  void onGreen(uint32_t ms = 0);

  /**
   * @brief     Turns on all the lights.
   * @param ms  The duration in milliseconds to keep all the lights on.
   */
  void onAll(uint32_t ms = 0);
You can also pass a time in milliseconds to these functions, and they will call the delay() function for that time from within the function. If you don’t pass a time, then there will be no delay.
Furthermore, the library also includes the following functions for flashing the LEDs: flashRed(), flashYellow(), flashGreen(), and flashAll().
					  /**
   * @brief             Flashes the red light.
   * @param numFlashes  The number of times to flash the red light. Default value is 1.
   * @param flashTime   The duration of each flash in milliseconds. Default value is 500 ms.
   */
  void flashRed(int numFlashes = 1, uint32_t flashTime = 500);

  /**
   * @brief             Flashes the yellow light.
   * @param numFlashes  The number of times to flash the yellow light. Default value is 1.
   * @param flashTime   The duration of each flash in milliseconds. Default value is 500 ms.
   */
  void flashYellow(int numFlashes = 1, uint32_t flashTime = 500);

  /**
   * @brief             Flashes the green light.
   * @param numFlashes  The number of times to flash the green light. Default value is 1.
   * @param flashTime   The duration of each flash in milliseconds. Default value is 500 ms.
   */
  void flashGreen(int numFlashes = 1, uint32_t flashTime = 500);

  /**
   * @brief             Flashes all the lights.
   * @param numFlashes  The number of times to flash all the lights. Default value is 1.
   * @param flashTime   The duration of each flash in milliseconds. Default value is 500 ms.
   */
  void flashAll(int numFlashes = 1, uint32_t flashTime = 500);
You can pass to these functions the number of flashes you want followed by the duration of each flash in milliseconds. If you pass nothing to the function, then it will just flash once for 500 ms.
Finally, the TrafficLight class also allows you to check the state of each light (whether it is on/off). This can be useful if you want to check the state of the lights in your code to perform something else depending on which light is on. Your creativity is the limit on how you can use these functions. The functions are: getRedState(), getYellowState(), and getGreenState().
					  /**
   * @brief   Get the current state of the red light.
   * @return  The current state of the red light as a boolean value.
   *          Returns true if the red light is on, and false if it is off.
   */
  bool getRedState() const;

  /**
   * @brief   Get the current state of the yellow light.
   * @return  The current state of the yellow light as a boolean value.
   *          Returns true if the yellow light is on, and false if it is off.
   */
  bool getYellowState() const;

  /**
   * @brief   Get the current state of the green light.
   * @return  The current state of the green light as a boolean value.
   *          Returns true if the green light is on, and false if it is off.
   */
  bool getGreenState() const;
These functions return true if the respective light is on, or false if the respective light is off.
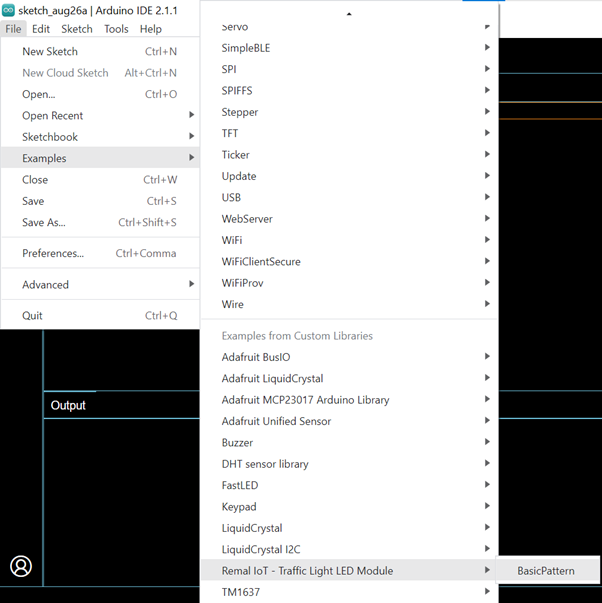
Now that you are familiar with all of the TrafficLight library’s functions, we can begin writing code for it. The library comes packaged with a prewritten example called BasicPattern.ino. To access this example, you need to go to File > Examples > Remal IoT – Traffic Light LED Module > BasicPattern, as shown below.
Alternatively, you can just copy the example code from below.
					// Include the TrafficLight library
#include <TrafficLight.h>

// Define the pins for the red, yellow, and green LEDs
#define R_PIN 0
#define Y_PIN 1
#define G_PIN 2

// Define the time durations for the lights in milliseconds, and the number of times to flash the green light
#define RED_TIME 13500
#define YELLOW_TIME 3000
#define GREEN_TIME 11500
#define NUM_FLASHES 4
#define FLASH_TIME 500

// Create the traffic light object and pass the respective pin numbers as parameters
// Sets the pins as output, and turn all lights off
TrafficLight traffic_light(R_PIN, Y_PIN, G_PIN);

void setup()
{

}

void loop()
{
  // Turn on the red light for RED_TIME milliseconds
  traffic_light.onRed(RED_TIME);

  // Turn off the red light
  traffic_light.offRed();

  // Turn on the green light for GREEN_TIME milliseconds
  traffic_light.onGreen(GREEN_TIME);

  // Turn off the green light
  traffic_light.offGreen();

  // Flash the green light NUM_FLASHES times, with a FLASH_TIME delay between flashes
  traffic_light.flashGreen(NUM_FLASHES, FLASH_TIME);

  // Turn on the yellow light for YELLOW_TIME milliseconds
  traffic_light.onYellow(YELLOW_TIME);

  // Turn off the yellow light
  traffic_light.offYellow();
}
We start the code by including the TrafficLight library, so we can make use of it in our project.
					// Include the TrafficLight library
#include <TrafficLight.h>
After that, we write the same defines as the previous example.
					// Define the pins for the red, yellow, and green LEDs
#define R_PIN 0
#define Y_PIN 1
#define G_PIN 2

// Define the time durations for the lights in milliseconds, and the number of times to flash the green light
#define RED_TIME 13500
#define YELLOW_TIME 3000
#define GREEN_TIME 11500
#define NUM_FLASHES 4
#define FLASH_TIME 500
Now, this is where the code starts to look different. We need to create the TrafficLight object, which is done by calling the constructor.
					// Create the traffic light object and pass the respective pin numbers as parameters
// Sets the pins as output, and turn all lights off
TrafficLight traffic_light(R_PIN, Y_PIN, G_PIN);
We pass to the constructor the values of the R, Y, and G pins. The constructor sets these pins as outputs, and it also turns all of the LEDs off.
Next up, we have our setup function.
					void setup()
{

}
As you can see, the setup function is empty. If you compare this with the previous example, it may seem like we have forgotten some things. However, don’t you worry, we didn’t forget anything! The reason that the setup is empty is because the constructor did all of the setting up for us. When we called the constructor and passed the pins to it, it set those pins as outputs and turned off all the LEDs. This is just the first example of how the TrafficLight library can make our lives easier (and our code much simpler).
After that, we have our loop function.
					void loop()
{
  // Turn on the red light for RED_TIME milliseconds
  traffic_light.onRed(RED_TIME);

  // Turn off the red light
  traffic_light.offRed();

  // Turn on the green light for GREEN_TIME milliseconds
  traffic_light.onGreen(GREEN_TIME);

  // Turn off the green light
  traffic_light.offGreen();
Here, we turn on the red LED by calling the onRed() function. We will also pass RED_TIME to the function, which will cause it to delay for 13.5 seconds. Next, we turn off the red LED by calling offRed(). As you can see, we can pass the time in milliseconds to the function, instead of having to call delay() ourselves. We also do the same for the green LED. We turn it on, wait for 11.5 seconds, and then we turn it off.
Next, we want to flash the green LED.
					  // Flash the green light NUM_FLASHES times, with a FLASH_TIME delay between flashes
  traffic_light.flashGreen(NUM_FLASHES, FLASH_TIME);
This is done simply by calling the flashGreen() function and passing NUM_FLASHES and FLASH_TIME to it. This is much simpler than the way we did it in the previous example, and it still achieves the exact same effect. Here, the light LED will flash on and off 4 times with a flash time of 500 ms, based on our defined NUM_FLASHES and FLASH_TIME values.
Lastly, we want to control the yellow LED.
					  // Turn on the yellow light for YELLOW_TIME milliseconds
  traffic_light.onYellow(YELLOW_TIME);

  // Turn off the yellow light
  traffic_light.offYellow();
}
Here, we turn on the yellow LED, wait for 3 seconds, and then we turn it off.
Try uploading this code to your board, and you will see that the traffic light behaves in the exact same way as the first example. The behavior of the traffic light didn’t change, however, the code used to achieve this behavior became much simpler.
Now that you have learned how to interface the Mini 5V Traffic Light LED Module (both directly and with the use of the library), it’s time to write your own code. As you saw, the TrafficLight library simplified the process of controlling the component, and you can now make use of it in your own future projects. You can try creating your own traffic light pattern from scratch using the library. You can also try working on something more complex, making use of all of the library’s available functions. It is up to you on how creative you want to be with your projects. Lastly, you can also go through the source code of the library to see how it works, and to get a better understanding and detailed look at the inner workings of the TrafficLight library.