Atlas

أطلس

Founders Edition – v2

What is Atlas?

The third development board in Remal IoT’s family of development boards.

Atlas means “a book of maps”, and so, here at Remal IoT, we would like to think of Atlas as a board for anyone interested in exploring the world of IoT and embedded systems, using only one board as a foundation to learn.

Already own an Atlas board?

Some of Atlas’s Features:

  • For rapid prototyping and testing
  • Solderable breadboarding area!
  • Can be powered by USB-C or any battery via screw terminal
  • Able to handle up to 1.5A when using USB-C!
  • Four addressable RGB LED
  • 2 free buttons
  • MicroSD card slot for data logging or anything else
  • On-board temperature and humidity sensor (unused alert pin broken out)
  • On-board accelerometer (two unused interrupt pins broken out)
  • Comes with 2 mini solderless breadboards for testing designs before soldering
  • Arduino IDE support!
  • Focused on educational use
  • Cool rectangular design (goodbye circle🥲)

The goal of Atlas🌍 is to allow users to feel comfortable working with hardware and writing code that interfaces with sensors. Several components are built-in to allow users to get started with no additional hardware. The large breadboarding area allows many different projects to be built using the Atlas board as a foundation. All rows are connected (except the Arduino pinouts, which have their own area). This means you can easily connect and solder a lot of additional sensors and actuators and have Atlas be a powerful and all-encompassing board for your project, research, or prototype. You could also design and 3D print a case for your Atlas board!

Atlas Founders Edition (v2) Quick Start Guide

Atlas Pinout Diagram

Atlas is powered by Microchip’s ATmega32U4. It is reliable and used by many across the industry. We highly encourage users to check out these resources to get the most out of their Atlas board:

Atlas Example Code

The Atlas board comes with pre-flashed with demo code that allows you to interact with all the components on the board. One feature of the demo code is an RGB LED that changes colors continuously. You can also use the accelerometer to move the LED left or right. In addition, the demo code sends accelerometer readings to your computer via serial communication. The temperature and humidity sensor also takes readings every second, which are saved to a file on the SD card (if inserted at startup) called “Readings.txt” and sent to your computer via serial communication. If the humidity reading exceeds 80%, all the RGB LEDs on the Atlas board will turn red until the humidity falls below this threshold. Using buttons 1 and 2, you can adjust the intensity of the LED brightness.

You can find the above demo code and more after adding Atlas to the Arduino IDE, selecting it, and then navigating to “File -> Examples -> Atlas Founders Edition Examples”

You can explore other examples that showcase cool capabilities. Although these examples were not written by us, most should work directly. However, some might require adapting the code slightly to make it run correctly on your Atlas board.

Note: after installing Atlas from the board manager and selecting it in the Arduino IDE, you can leverage its pre-defined keywords in your projects. These keywords will automatically be substituted with the corresponding values:

				
					LED_BUILTIN             //Atlas built-in addressable RGB LEDs pin number (13)

ATLS_BTN1               //Atlas's Button 1 pin number (12) - Pulled-down
ATLS_BTN2               //Atlas's Button 2 pin number (10) - Pulled-down

ATLS_SDCARD_CS          //MicroSD Card CS pin number (7)

ATLS_I2C_TEMP_ADDR		//The I2C address of the SHT30 sensor (0x44)
ATLS_I2C_ACCEL_ADDR		//The I2C address of the LIS3DHTR sensor (0x18)

SCL                     //I2C clock line pin number (3)
SDA                     //I2C data line pin number (2)

MOSI                    //SPI Master Out Slave In pin number (16)
MISO                    //SPI Master In Slave Out pin number (14)
SCK                     //SPI clock pin number (15)


Atlas - Entering the Bootloader

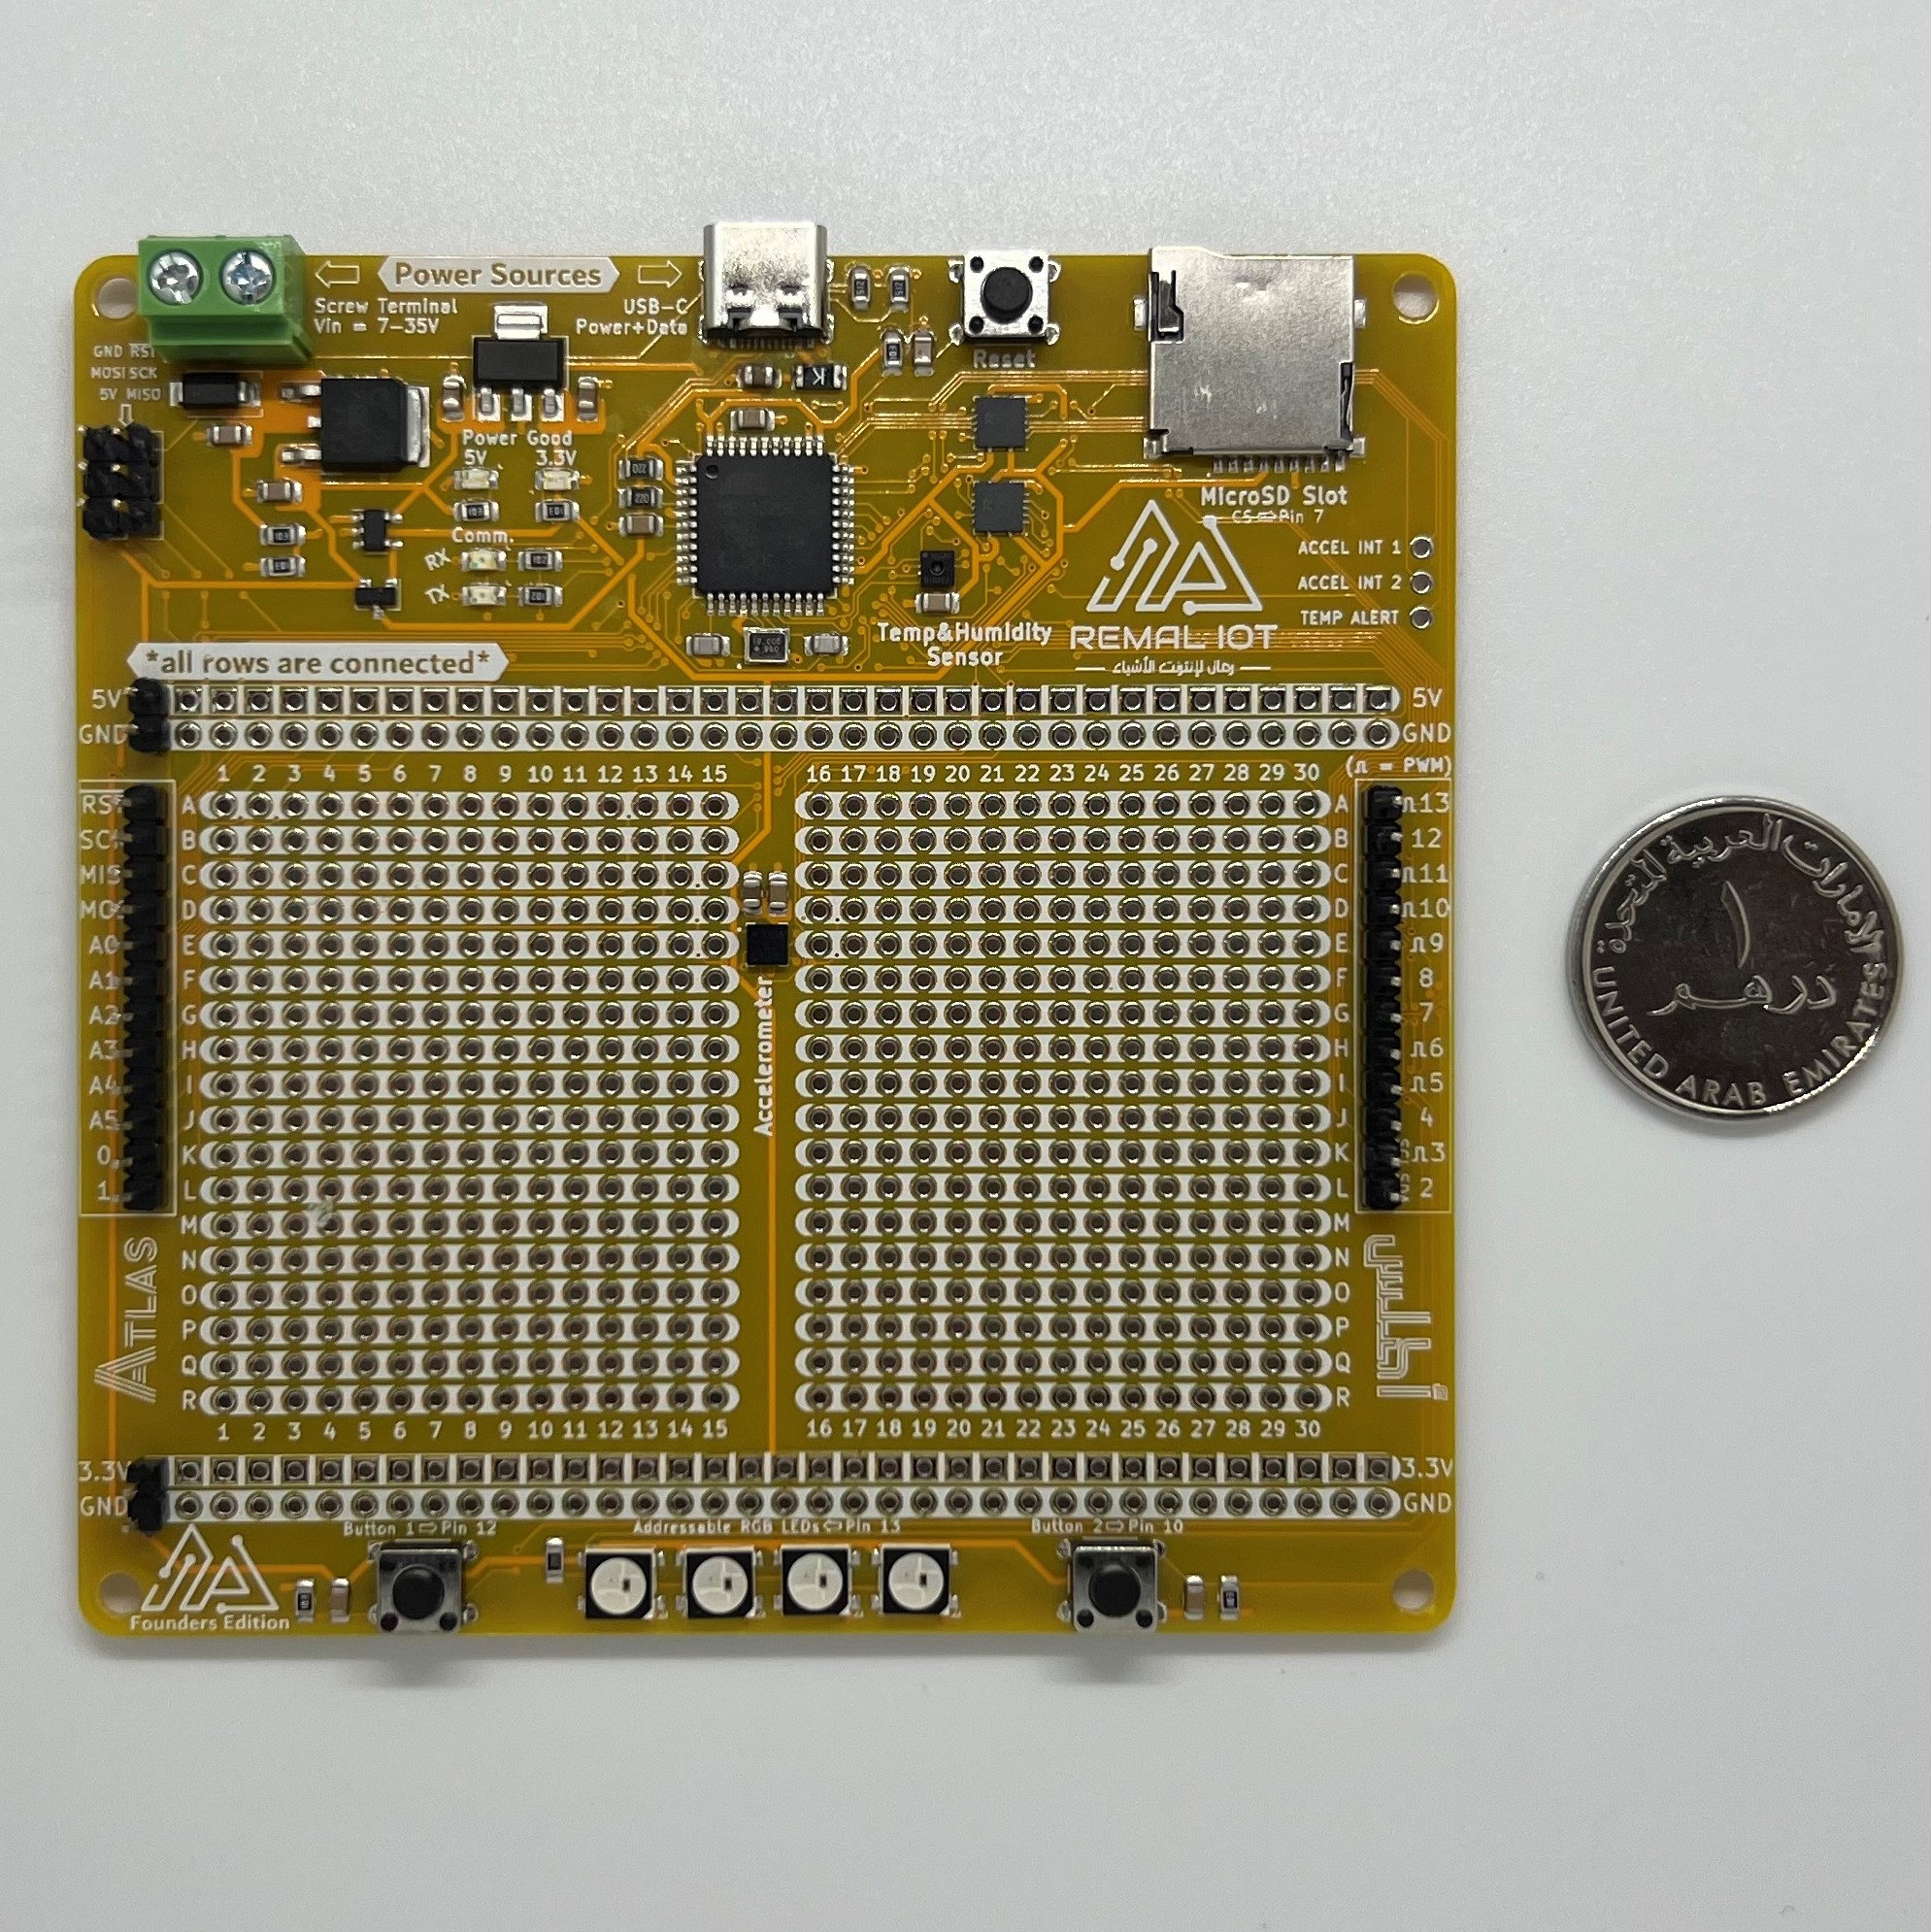
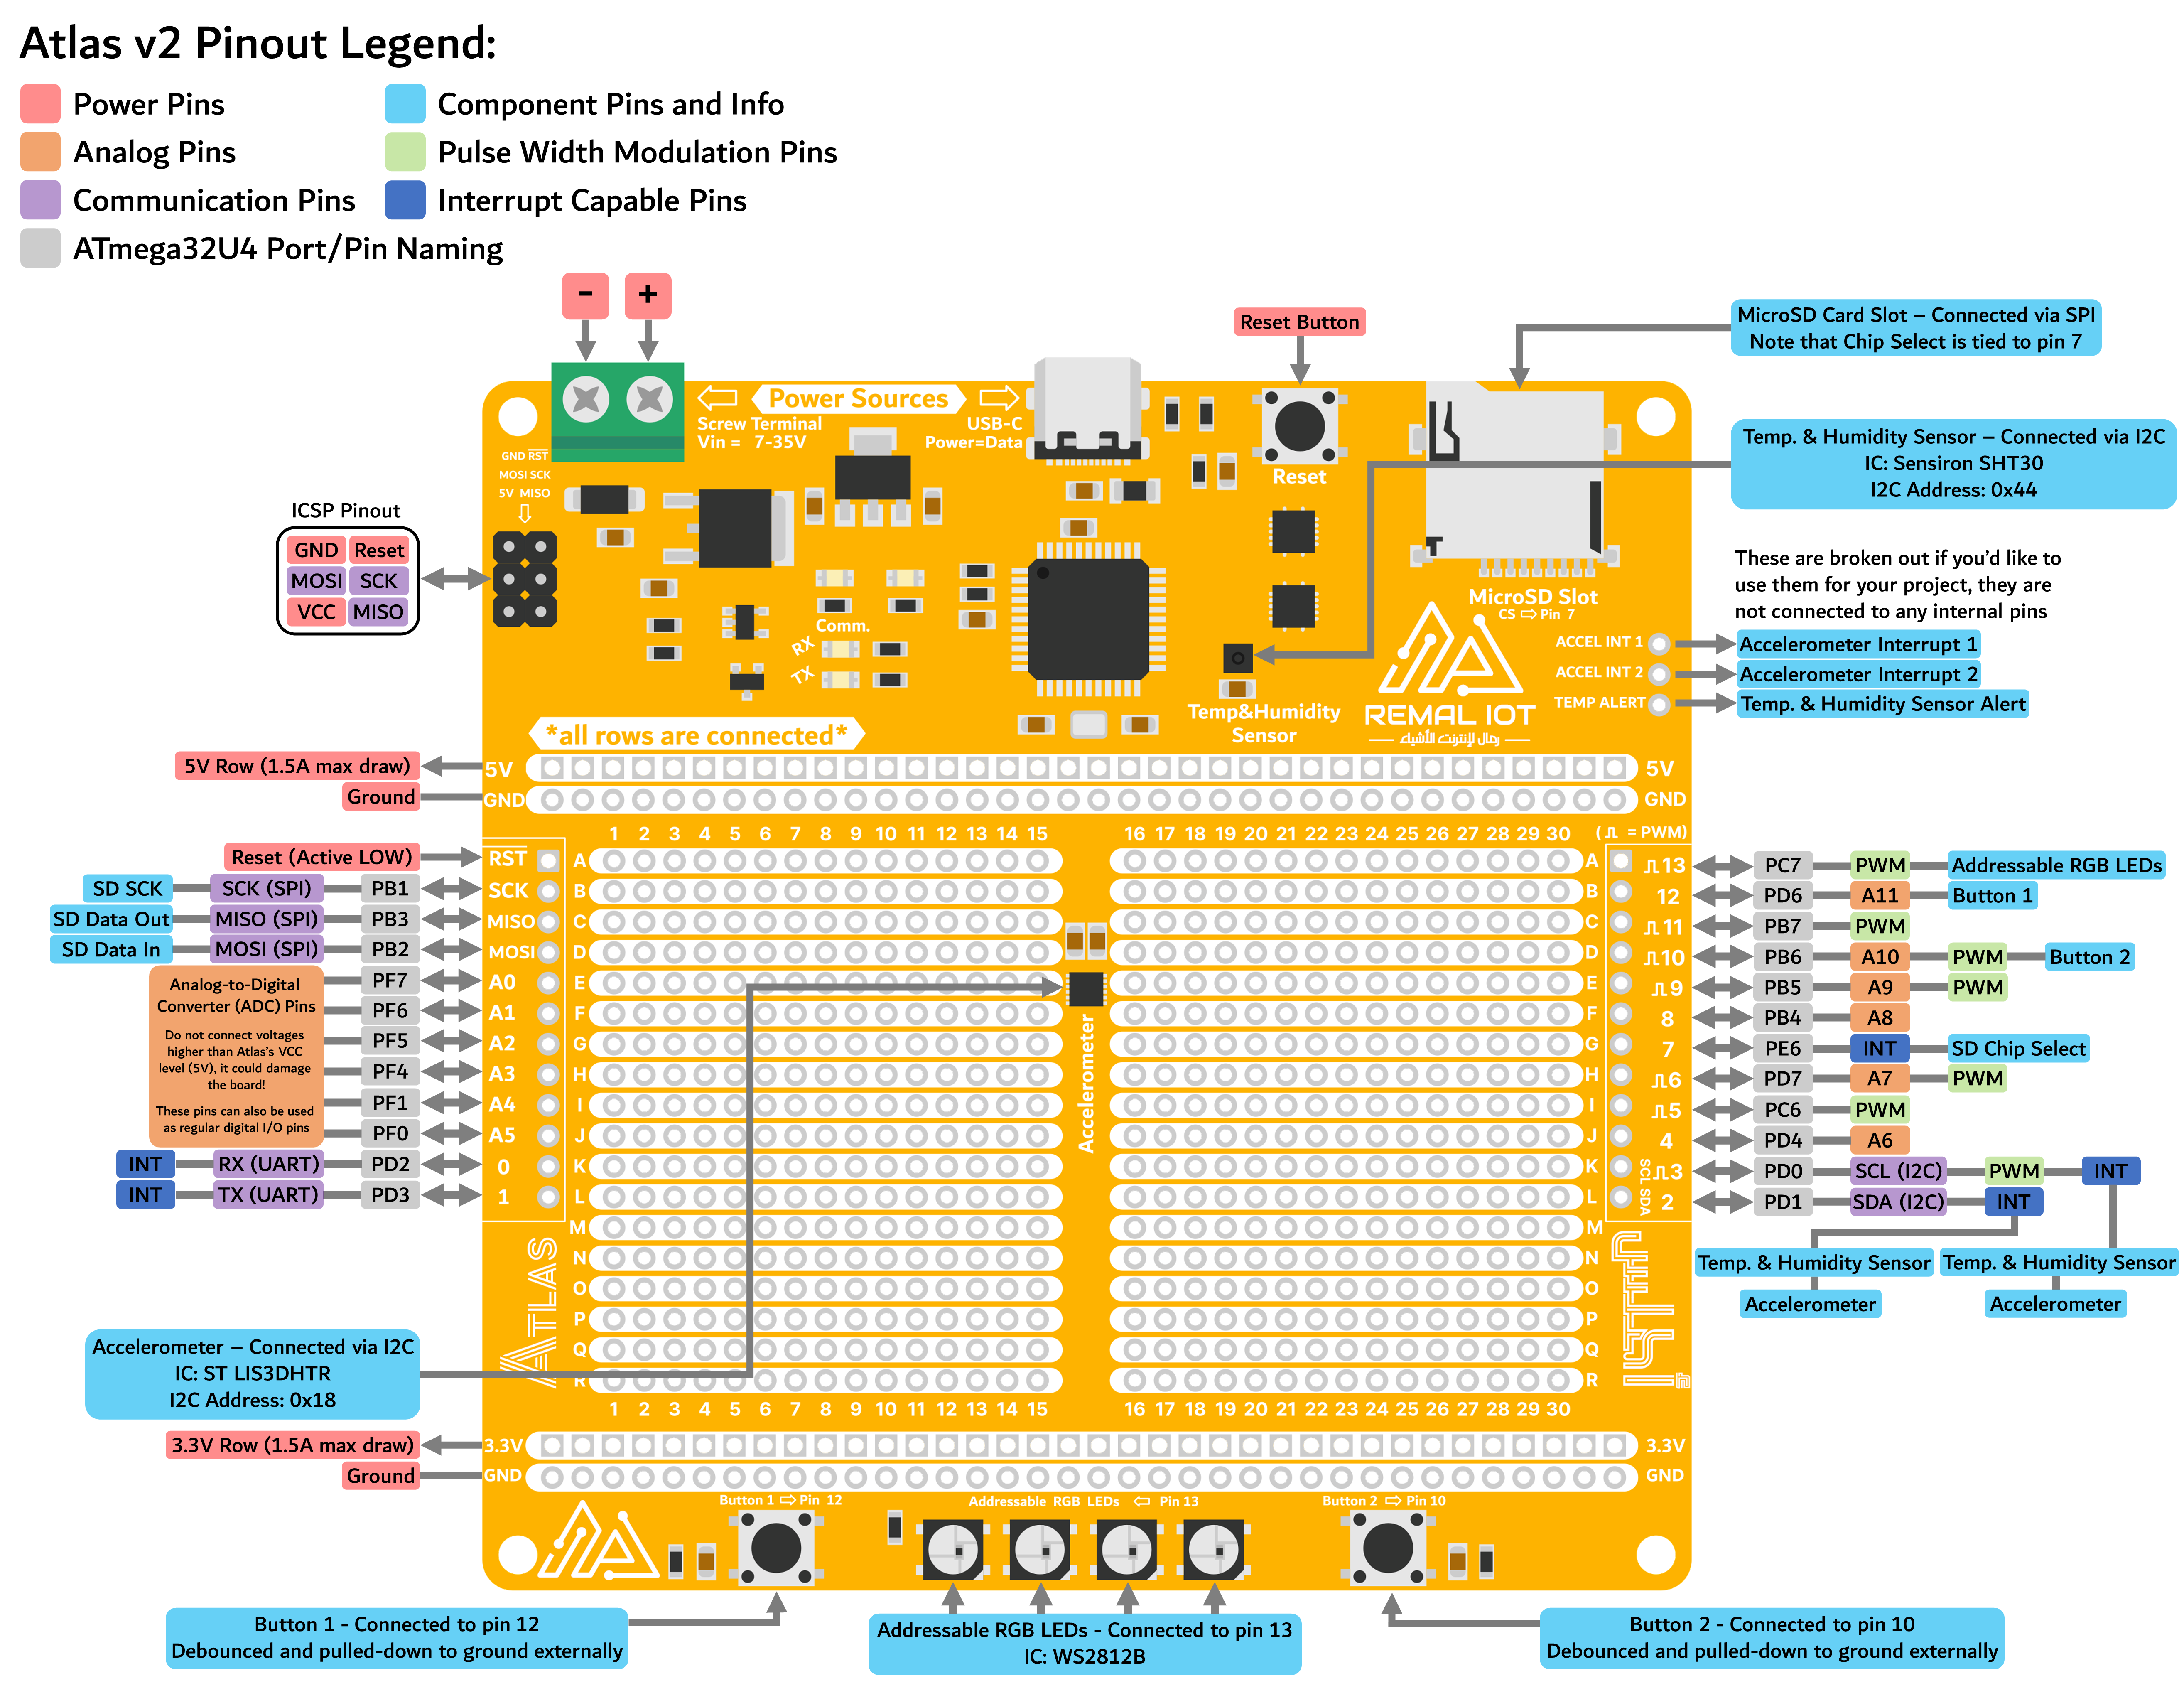
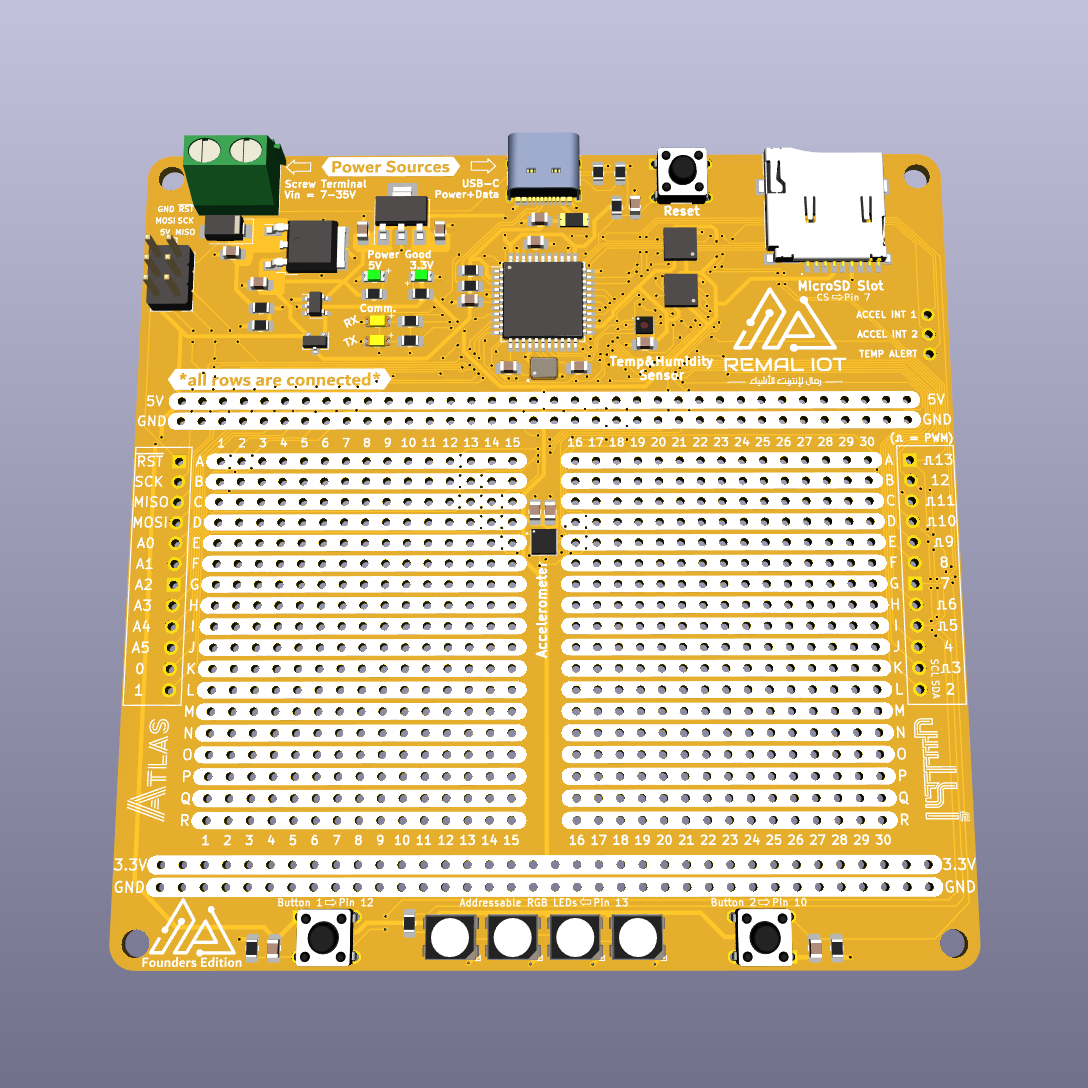
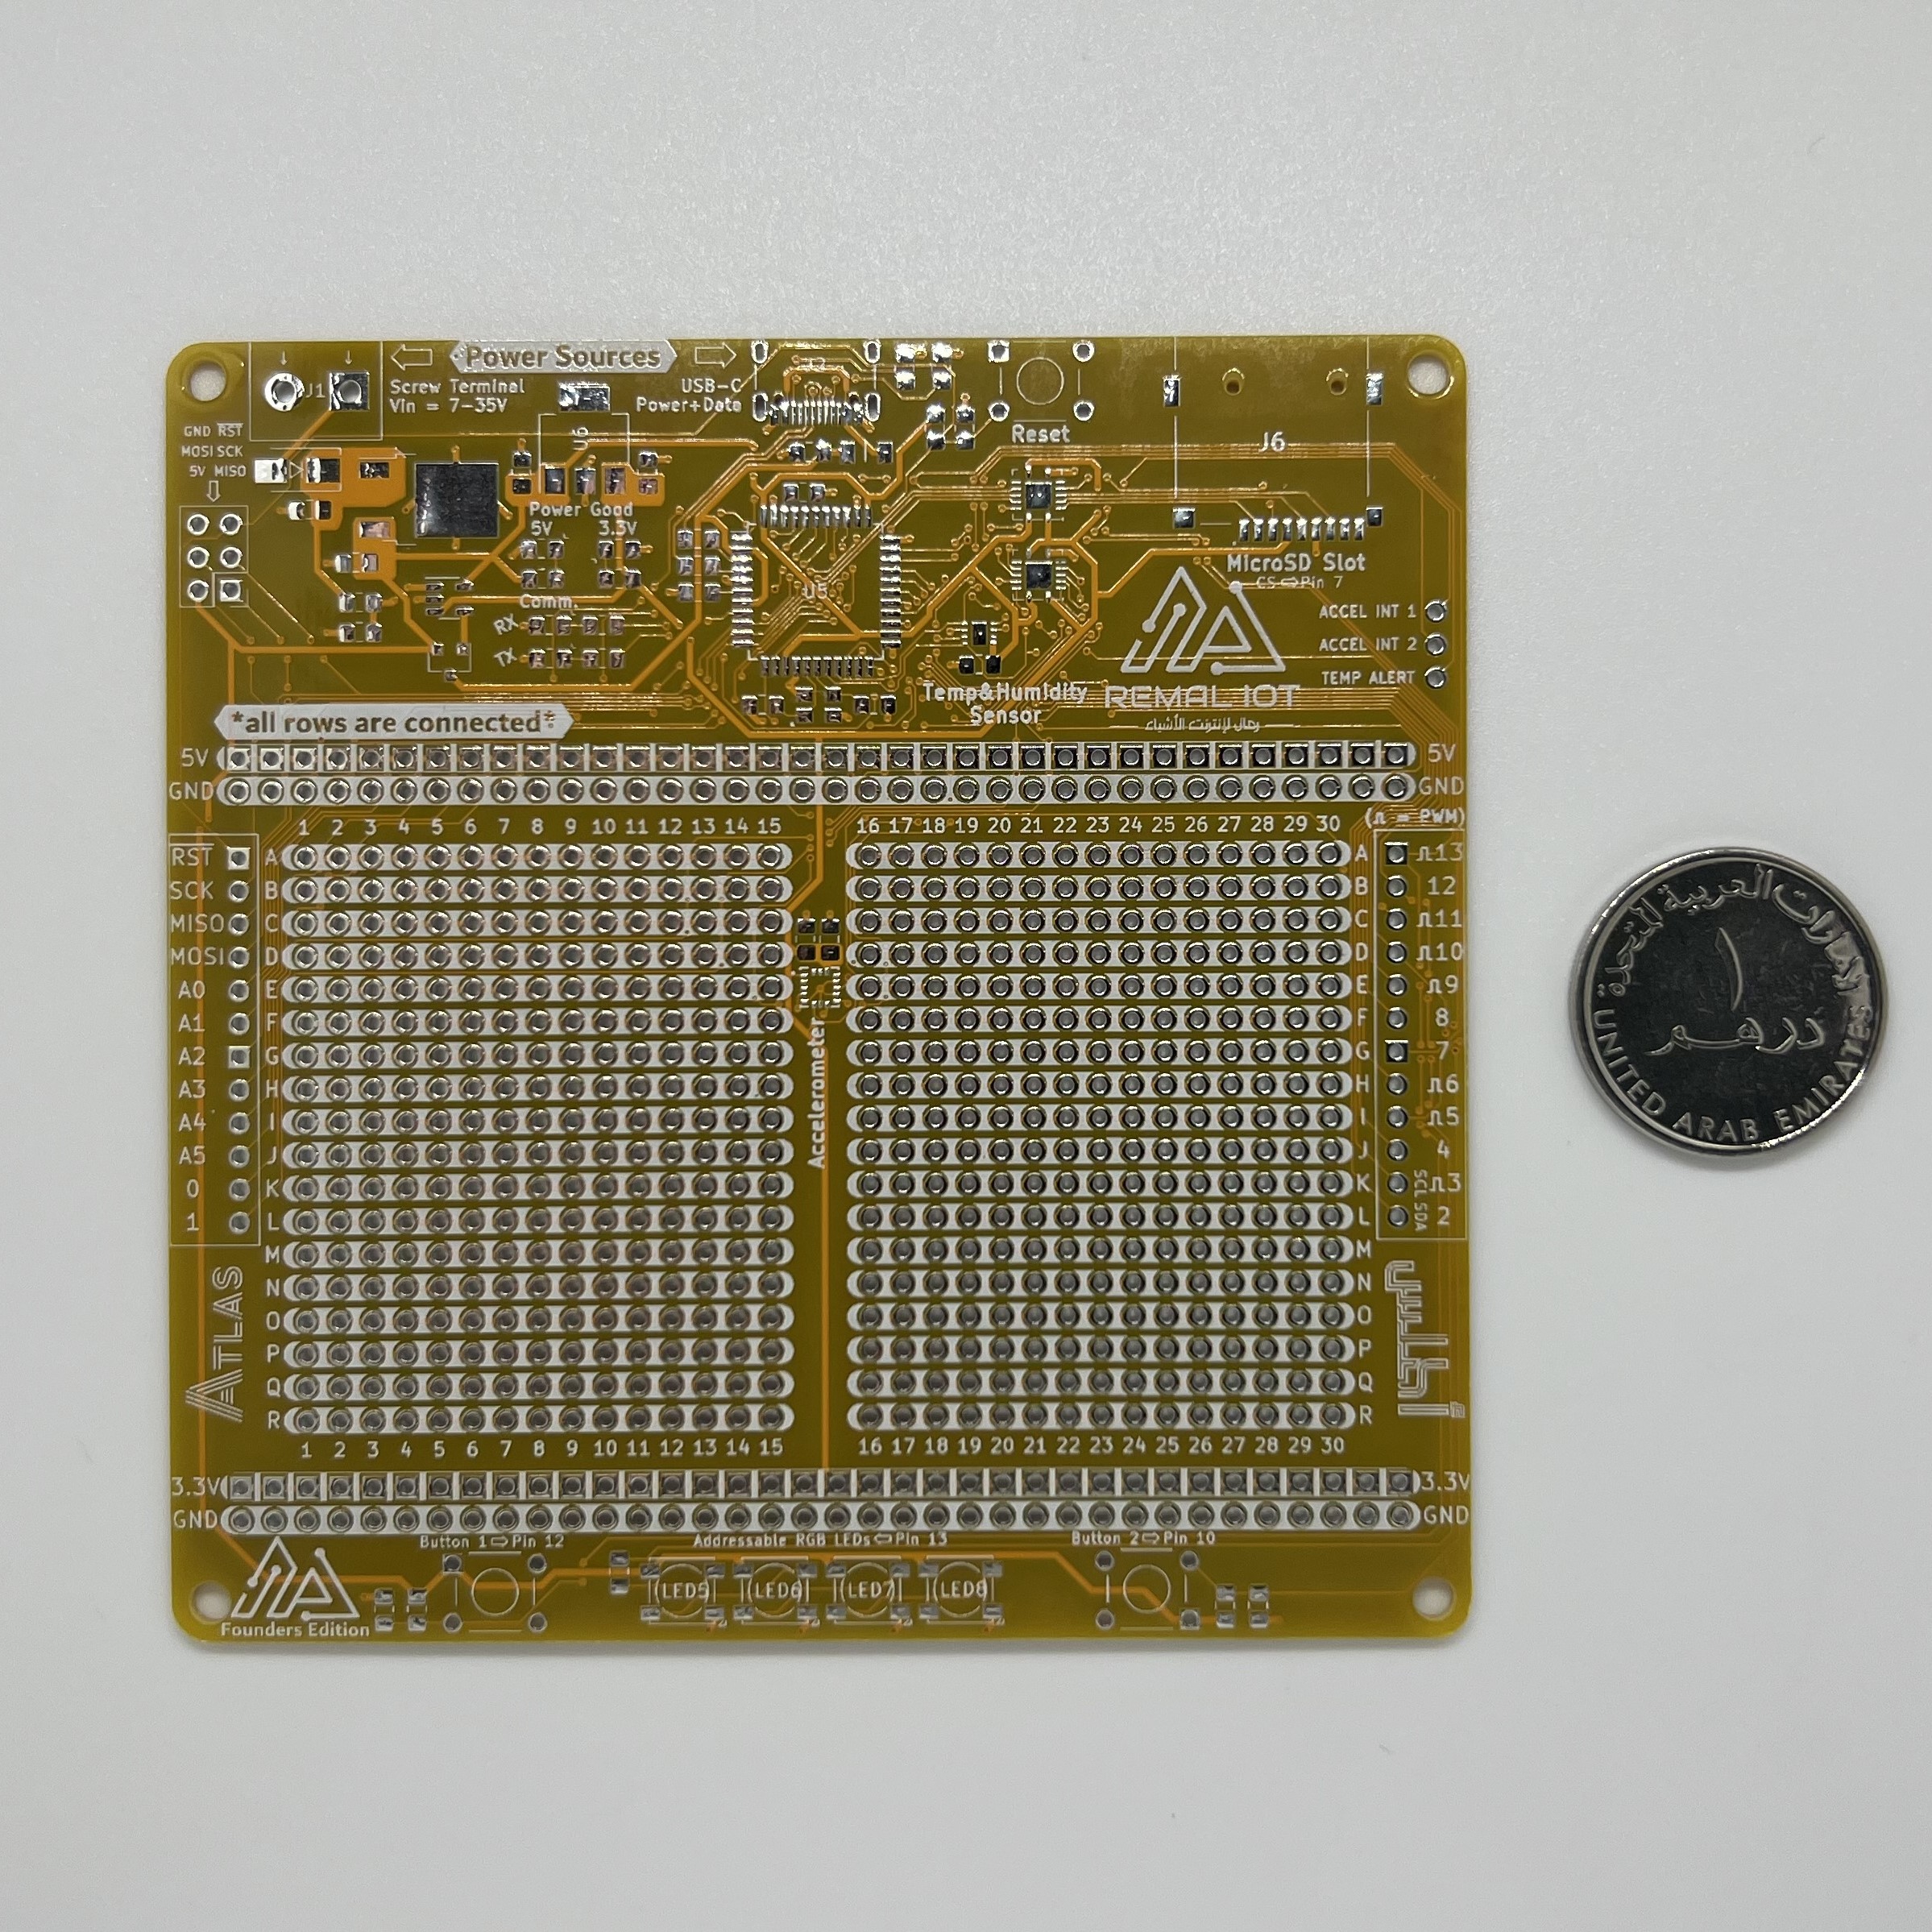
When you work on the Atlas board, it’s possible to write code that alters or disables USB functionality, rendering the board unresponsive to new code uploads through the Arduino IDE. However, you can easily resolve this issue by entering “Bootloader” mode on your Atlas board. To do this, simply double-click the reset button. The board will stay in bootloader mode for 10 seconds, during which time you can upload new code. If no upload command is received during this window, the board will revert to executing the previously flashed code.

Atlas Revisions

➤ Atlas v2
 Atlas v1