Hello, everyone! In today’s blog post, we’re diving into the world of building an effective alarm system. We’ll walk you through the process using the Shabakah board.
Activation: To start the alarm system, the user simply needs to press a designated button. This step initializes the entire process.
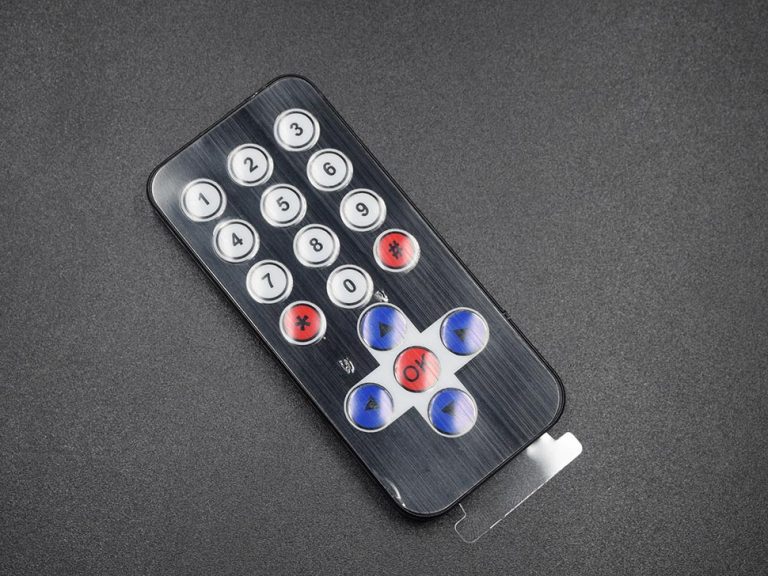
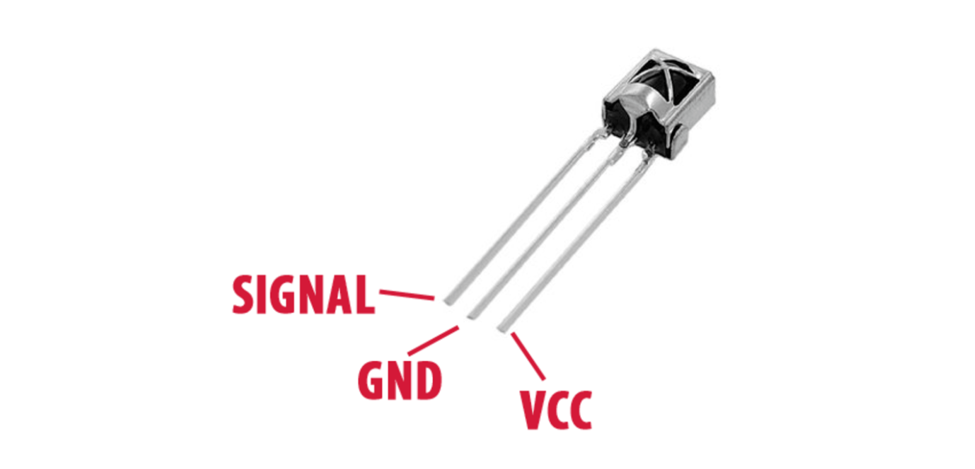
Input: After activation, the user employs an infrared (IR) remote control to input a specific duration in seconds. This duration serves as the time interval for which the alarm system will operate.
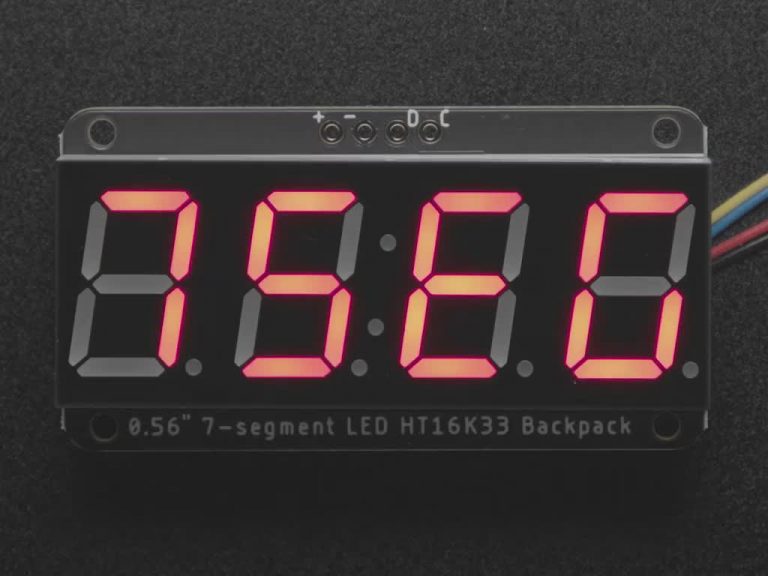
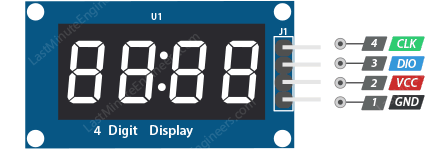
Display: Once the user has entered the desired duration, the system displays this duration on a user-friendly 4-digit 7-segment display. This display acts as a visual indicator, allowing the user to monitor the progress of time in a clear and straightforward manner.
Count-Up: As soon as the duration is set and displayed, the system begins counting up in seconds. This count-up is prominently showcased on the LED display, ensuring that the user is always aware of how much time has elapsed since activation.
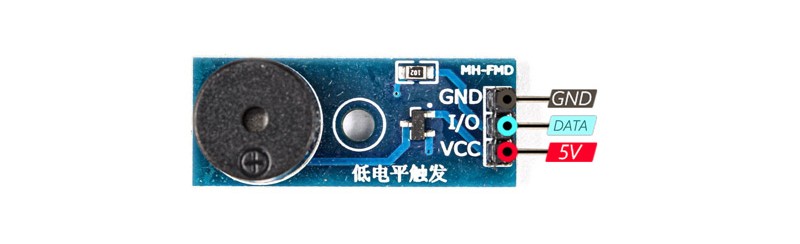
Buzzer Melody: When the elapsed time matches the user-defined duration, the system triggers a buzzer to play a delightful melody inspired by the iconic Star Wars theme. This auditory signal acts as both a notification and an engaging element, making the conclusion of the timer more enjoyable.
In summary, the alarm system’s operation involves a user-friendly sequence: activation, inputting the desired time, monitoring the count-up on the LED display, and finally, enjoying the Star Wars-themed melody when the set time elapses. This combination of clear visuals and audible cues ensures an efficient and engaging experience for users relying on the alarm system
1) IR Remote
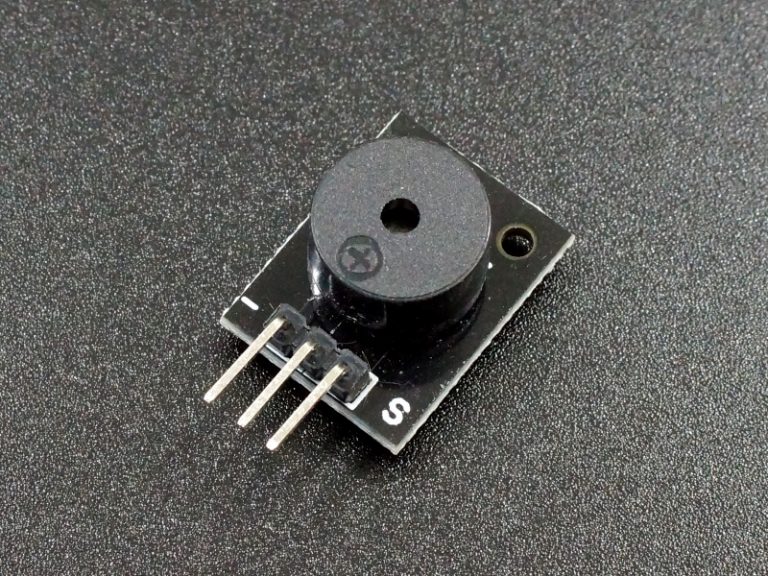
2) Passive Buzzer.
This will be used to produce the melody.
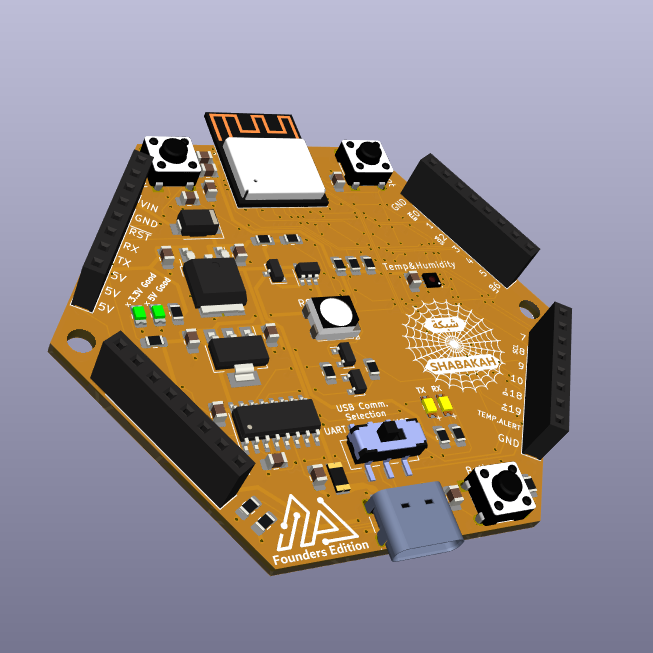
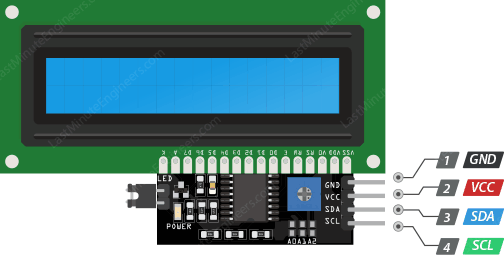
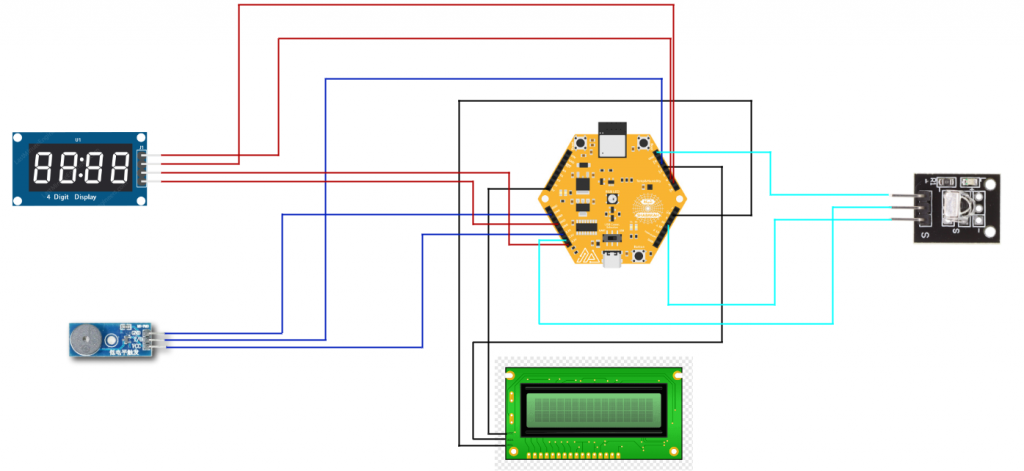
The connections for this system are pretty simple. It uses 4 DIO pins and 1 I2C interface pins.
First of all the IR Remote requires to be connected to 1 DIO pin, 1 3.3V VCC pin and 1 GRD pin.
For this system, we will use pin 10 for DIO.
The 4-digit 7-segment display required 2 DIO pins, one is used for transmitting digital data and one is used as a clock for synchronization.
The DIO pins used are pin 4 and pin 5.
The code for this project is pretty straightforward. It’s written in Arduino. I will add it all below, then explain it in sections.
					/**
 * @file Alarm_Setter.ino
 * @brief Timer Countdown Program
 * @author Zain Kamal, Remal IoT
 * @date 22 July 2023
 *
 * This program implements a timer countup using a Shabakah board.
 * It displays the remaining time on a TM1637 7-segment display, receives input from an IR remote, and produces sound using a buzzer.
 * The countdown duration is set through the IR remote.
 */

#include <TM1637Display.h>
#include <LiquidCrystal_I2C.h>
#include <Buzzer.h>
#include <IRremote.h>

// Module connection pins (Digital Pins)
#define CLK         4
#define DIO         5
#define BUZZERPIN   1
#define IRPIN       10

TM1637Display display(CLK, DIO);
LiquidCrystal_I2C lcd(0x27, 16, 2);
Buzzer buzzer(BUZZERPIN);
IRrecv ir(IRPIN);

int currentTime = 0;  /** Current time counter */
int limit;            /** Countdown limit */
String limitSTR = "";
char tempIRreading = '\0';
bool continueLoop = true;  /** Control variable for the main loop */

/**
 * @brief Setup function for initializing the program
 */
void setup() {

  pinMode(SHBK_BTN, INPUT);

  ir.enableIRIn();

  lcd.init();
  lcd.backlight();
  lcd.setCursor(0, 0);  // top left

  display.setBrightness(0x0f);  // Set the brightness of the display (0-7)

  lcd.clear();
  lcd.print("Press button to");
  lcd.setCursor(0, 1);
  lcd.print("Start");
}

/**
 * @brief Main loop function for running the timer countdown
 */
void loop() {
  uint8_t segments[4];

  // Create the time display segments
  segments[0] = display.encodeDigit(0);  // Tens digit of minutes
  segments[1] = display.encodeDigit(0);  // Ones digit of minutes
  segments[2] = display.encodeDigit(0);  // Tens digit of seconds
  segments[3] = display.encodeDigit(0);  // Ones digit of seconds

  // Display the time
  display.setSegments(segments);

  while (!digitalRead(SHBK_BTN)) {}

  lcd.clear();
  lcd.setCursor(0, 0);
  lcd.print("Enter the seconds");
  lcd.setCursor(0, 1);

  while(tempIRreading != 'K') {
    ir.resume();
    while(!ir.decode()) {}                // Wait until the IR receiver receives a value
    tempIRreading = IRTranslate(ir.decodedIRData.decodedRawData);
    if (isDigit(tempIRreading)) {
      limitSTR += tempIRreading;
      lcd.clear();
      lcd.setCursor(0, 0);
      lcd.print("Enter the seconds");
      lcd.setCursor(0, 1);
      lcd.print(limitSTR);
    }
  }

  limit = limitSTR.toInt();

  lcd.setCursor(0, 1);
  lcd.print(limit);

  while (continueLoop) {

    // Calculate minutes
    unsigned int minutes = currentTime / 60;

    // Calculate remaining seconds
    unsigned int seconds = currentTime % 60;

    segments[0] = display.encodeDigit(minutes / 10);  // Tens digit of minutes
    segments[1] = display.encodeDigit(minutes % 10);  // Ones digit of minutes
    segments[2] = display.encodeDigit(seconds / 10);  // Tens digit of seconds
    segments[3] = display.encodeDigit(seconds % 10);  // Ones digit of seconds

    // Display the time
    display.setSegments(segments);

    if (currentTime == limit) {
      while (!digitalRead(SHBK_BTN)) {
        buzzer.begin(10);

        // Play the melody
        buzzer.sound(NOTE_A3, 500);
        buzzer.sound(NOTE_A3, 500);
        buzzer.sound(NOTE_A3, 500);
        buzzer.sound(NOTE_F3, 375);
        buzzer.sound(NOTE_C4, 125);

        buzzer.sound(NOTE_A3, 500);
        buzzer.sound(NOTE_F3, 375);
        buzzer.sound(NOTE_C4, 125);
        buzzer.sound(NOTE_A3, 1000);

        buzzer.sound(NOTE_E4, 500);
        buzzer.sound(NOTE_E4, 500);
        buzzer.sound(NOTE_E4, 500);
        buzzer.sound(NOTE_F4, 375);
        buzzer.sound(NOTE_C4, 125);

        buzzer.sound(NOTE_GS3, 500);
        buzzer.sound(NOTE_F3, 375);
        buzzer.sound(NOTE_C4, 125);
        buzzer.sound(NOTE_A3, 1000);

        buzzer.sound(NOTE_A4, 500);
        buzzer.sound(NOTE_A3, 375);
        buzzer.sound(NOTE_A3, 125);
        buzzer.sound(NOTE_A4, 500);
        buzzer.sound(NOTE_GS4, 375);
        buzzer.sound(NOTE_G4, 125);

        buzzer.sound(NOTE_FS4, 125);
        buzzer.sound(NOTE_E4, 125);
        buzzer.sound(NOTE_F4, 250);
        buzzer.sound(0, 250);
        buzzer.sound(NOTE_AS3, 250);
        buzzer.sound(NOTE_DS4, 500);
        buzzer.sound(NOTE_D4, 375);
        buzzer.sound(NOTE_CS4, 125);

        buzzer.sound(NOTE_C4, 125);
        buzzer.sound(NOTE_B3, 125);
        buzzer.sound(NOTE_C4, 250);
        buzzer.sound(0, 250);
        buzzer.sound(NOTE_F3, 250);
        buzzer.sound(NOTE_GS3, 500);
        buzzer.sound(NOTE_F3, 375);
        buzzer.sound(NOTE_A3, 125);

        buzzer.sound(NOTE_C4, 500);
        buzzer.sound(NOTE_A3, 375);
        buzzer.sound(NOTE_C4, 125);
        buzzer.sound(NOTE_E4, 1000);

        buzzer.sound(NOTE_A4, 500);
        buzzer.sound(NOTE_A3, 375);
        buzzer.sound(NOTE_A3, 125);
        buzzer.sound(NOTE_A4, 500);
        buzzer.sound(NOTE_GS4, 375);
        buzzer.sound(NOTE_G4, 125);

        buzzer.sound(NOTE_FS4, 125);
        buzzer.sound(NOTE_E4, 125);
        buzzer.sound(NOTE_F4, 250);
        buzzer.sound(0, 250);
        buzzer.sound(NOTE_AS3, 250);
        buzzer.sound(NOTE_DS4, 500);
        buzzer.sound(NOTE_D4, 375);
        buzzer.sound(NOTE_CS4, 125);

        buzzer.sound(NOTE_C4, 125);
        buzzer.sound(NOTE_B3, 125);
        buzzer.sound(NOTE_C4, 250);
        buzzer.sound(0, 250);
        buzzer.sound(NOTE_F3, 250);
        buzzer.sound(NOTE_GS3, 500);
        buzzer.sound(NOTE_F3, 375);
        buzzer.sound(NOTE_C4, 125);

        buzzer.sound(NOTE_A3, 500);
        buzzer.sound(NOTE_F3, 375);
        buzzer.sound(NOTE_C4, 125);
        buzzer.sound(NOTE_A3, 1000);
        // ...

        buzzer.end(2000);

        currentTime = 0;
        continueLoop = false;
        break;
      }
    }

    delay(1000);  // Update the display every second

    currentTime++;
  }
}

char IRTranslate(long long unsigned int IRresult) {
  switch(IRresult){
    case 3125149440:
      return '1';
    case 3108437760:
      return '2';
    case 3091726080:
      return '3';
    case 3141861120:
      return '4';
    case 3208707840:
      return '5';
    case 3158572800:
      return '6';
    case 4161273600:
      return '7';
    case 3927310080:
      return '8';
    case 4127850240:
      return '9';
    case 3860463360:
      return '0';
    case 3810328320:
      return 'K';
    default:
      return '\0';
  }
}
We start with the headers, these are libraries needed to get the project working:
					#include <TM1637Display.h>
#include <LiquidCrystal_I2C.h>
#include <Buzzer.h>
#include <IRremote.h>
					// Module connection pins (Digital Pins)
#define CLK         4
#define DIO         5
#define BUZZERPIN   1
#define IRPIN       10
The below is used to initialize the objects for the defined libraries.
					TM1637Display display(CLK, DIO);
LiquidCrystal_I2C lcd(0x27, 16, 2);
Buzzer buzzer(BUZZERPIN);
IRrecv ir(IRPIN);
The global variables used in this project:
					int currentTime = 0;  /** Current time counter */
int limit;            /** Countdown limit */
String limitSTR = "";
char tempIRreading = '\0';
bool continueLoop = true;  /** Control variable for the main loop */
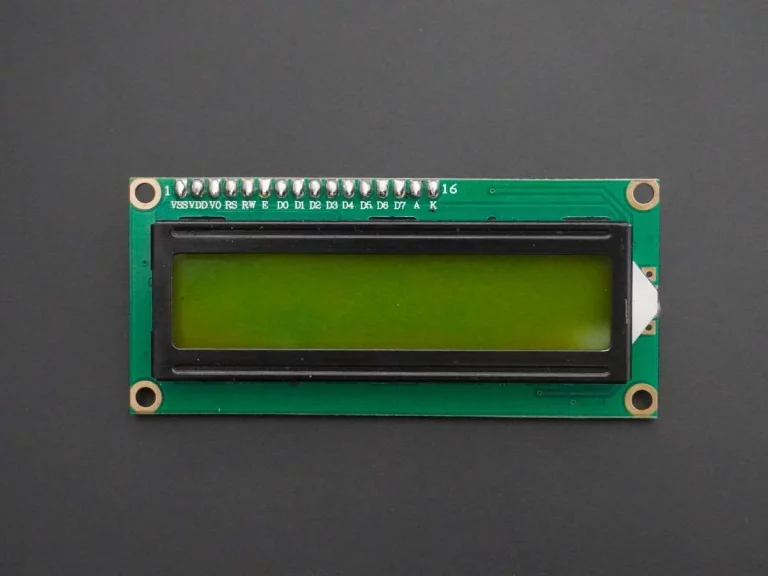
In this section, we will focus on setting up our project. The initial step involves configuring the pins on Shabakah. Once the pin configuration is complete, we proceed to enable the IR receiver to receive IR data. Following that, we initialize the LCD and ensure that the backlight is turned on. Additionally, we set the brightness of the 4-digit 7-segment display. Lastly, we initialize the text on the LCD.
					/**
 * @brief Setup function for initializing the program
 */
void setup() {

  pinMode(SHBK_BTN, INPUT);

  ir.enableIRIn();

  lcd.init();
  lcd.backlight();
  lcd.setCursor(0, 0);  // top left

  display.setBrightness(0x0f);  // Set the brightness of the display (0-7)
  Serial.begin(9600);

  lcd.clear();
  lcd.print("Press button to");
  lcd.setCursor(0, 1);
  lcd.print("Start                ");
}
In the loop function, our first task is to initialize the value that will be displayed by the 4-digit 7-segment display.
					/**
 * @brief Main loop function for running the timer countdown
 */
void loop() {
  uint8_t segments[4];

  // Create the time display segments
  segments[0] = display.encodeDigit(0);  // Tens digit of minutes
  segments[1] = display.encodeDigit(0);  // Ones digit of minutes
  segments[2] = display.encodeDigit(0);  // Tens digit of seconds
  segments[3] = display.encodeDigit(0);  // Ones digit of seconds

  // Display the time
  display.setSegments(segments);
Afterwards, the program will enter a waiting state until the user presses the built-in button on the Shabakah board. This action triggers a change in the displayed text on the LCD, prompting the user to input the desired number of seconds until the alarm goes off. Subsequently, the program waits to receive data from the IR remote. The received data will be stored in the ‘limit’ variable, which is then printed on the LCD.
					while (!digitalRead(SHBK_BTN)) {}

  lcd.clear();
  lcd.setCursor(0, 0);
  lcd.print("Enter the seconds");
  lcd.setCursor(0, 1);

  while(tempIRreading != 'K') {
    ir.resume();
    while(!ir.decode()) {}                //Wait until the ir reciever recieves a value
    tempIRreading = IRTranslate(ir.decodedIRData.decodedRawData);
    if (isDigit(tempIRreading)) {
      limitSTR += tempIRreading;
      lcd.clear();
      lcd.setCursor(0, 0);
      lcd.print("Enter the seconds");
      lcd.setCursor(0, 1);
      lcd.print(limitSTR);
    }
  }
  limit = limitSTR.toInt();

  lcd.setCursor(0, 1);
  lcd.print(limit);
Once the user enters the desired number of seconds until the alarm goes off, the program enters a while loop. Within this loop, the value displayed on the 4-digit 7-segment display is updated every second. The calculation process involves separating the minutes and remaining seconds. The leftmost digit of the display represents the tens digit of the minutes, the second leftmost digit represents the ones digit of the minutes, the second rightmost digit represents the tens digit of the seconds, and the rightmost digit represents the ones digit of the seconds.
					while (continueLoop) {

    // Calculate minutes
    unsigned int minutes = currentTime / 60;

    // Calculate remaining seconds
    unsigned int seconds = currentTime % 60;

    segments[0] = display.encodeDigit(minutes / 10);  // Tens digit of minutes
    segments[1] = display.encodeDigit(minutes % 10);  // Ones digit of minutes
    segments[2] = display.encodeDigit(seconds / 10);  // Tens digit of seconds
    segments[3] = display.encodeDigit(seconds % 10);  // Ones digit of seconds

    // Display the time
    display.setSegments(segments);
When the timer reaches the limit set by the user, the buzzer will be triggered, playing the melody of the Star Wars theme. Following this, all values will be reset to their initial state, allowing the system to be used again.
					if (currentTime == limit) {
      while (!digitalRead(SHBK_BTN)) {
        buzzer.begin(10);

        // Play the melody
         buzzer.sound(NOTE_A3, 500);
        buzzer.sound(NOTE_A3, 500);
        buzzer.sound(NOTE_A3, 500);
        buzzer.sound(NOTE_F3, 375);
        buzzer.sound(NOTE_C4, 125);

        buzzer.sound(NOTE_A3, 500);
        buzzer.sound(NOTE_F3, 375);
        buzzer.sound(NOTE_C4, 125);
        buzzer.sound(NOTE_A3, 1000);

        buzzer.sound(NOTE_E4, 500);
        buzzer.sound(NOTE_E4, 500);
        buzzer.sound(NOTE_E4, 500);
        buzzer.sound(NOTE_F4, 375);
        buzzer.sound(NOTE_C4, 125);

        buzzer.sound(NOTE_GS3, 500);
        buzzer.sound(NOTE_F3, 375);
        buzzer.sound(NOTE_C4, 125);
        buzzer.sound(NOTE_A3, 1000);

        buzzer.sound(NOTE_A4, 500);
        buzzer.sound(NOTE_A3, 375);
        buzzer.sound(NOTE_A3, 125);
        buzzer.sound(NOTE_A4, 500);
        buzzer.sound(NOTE_GS4, 375);
        buzzer.sound(NOTE_G4, 125);

        buzzer.sound(NOTE_FS4, 125);
        buzzer.sound(NOTE_E4, 125);
        buzzer.sound(NOTE_F4, 250);
        buzzer.sound(0, 250);
        buzzer.sound(NOTE_AS3, 250);
        buzzer.sound(NOTE_DS4, 500);
        buzzer.sound(NOTE_D4, 375);
        buzzer.sound(NOTE_CS4, 125);

        buzzer.sound(NOTE_C4, 125);
        buzzer.sound(NOTE_B3, 125);
        buzzer.sound(NOTE_C4, 250);
        buzzer.sound(0, 250);
        buzzer.sound(NOTE_F3, 250);
        buzzer.sound(NOTE_GS3, 500);
        buzzer.sound(NOTE_F3, 375);
        buzzer.sound(NOTE_A3, 125);

        buzzer.sound(NOTE_C4, 500);
        buzzer.sound(NOTE_A3, 375);
        buzzer.sound(NOTE_C4, 125);
        buzzer.sound(NOTE_E4, 1000);

        buzzer.sound(NOTE_A4, 500);
        buzzer.sound(NOTE_A3, 375);
        buzzer.sound(NOTE_A3, 125);
        buzzer.sound(NOTE_A4, 500);
        buzzer.sound(NOTE_GS4, 375);
        buzzer.sound(NOTE_G4, 125);

        buzzer.sound(NOTE_FS4, 125);
        buzzer.sound(NOTE_E4, 125);
        buzzer.sound(NOTE_F4, 250);
        buzzer.sound(0, 250);
        buzzer.sound(NOTE_AS3, 250);
        buzzer.sound(NOTE_DS4, 500);
        buzzer.sound(NOTE_D4, 375);
        buzzer.sound(NOTE_CS4, 125);

        buzzer.sound(NOTE_C4, 125);
        buzzer.sound(NOTE_B3, 125);
        buzzer.sound(NOTE_C4, 250);
        buzzer.sound(0, 250);
        buzzer.sound(NOTE_F3, 250);
        buzzer.sound(NOTE_GS3, 500);
        buzzer.sound(NOTE_F3, 375);
        buzzer.sound(NOTE_C4, 125);

        buzzer.sound(NOTE_A3, 500);
        buzzer.sound(NOTE_F3, 375);
        buzzer.sound(NOTE_C4, 125);
        buzzer.sound(NOTE_A3, 1000);
        // ...

        buzzer.end(2000);

        currentTime = 0;
        continueLoop = false;
        break;
      }
    }

    delay(1000);  // Update the display every second

    currentTime++;
  }
}
The function below is utilized to translate the value obtained by the IR reader into a character. This is achieved by implementing a switch statement that compares the value obtained by the IR reader with each case. Depending on the case, a corresponding character is returned.
					char IRTranslate(long long unsigned int IRresult) {
  switch(IRresult){
    case 3125149440:
      return '1';
    case 3108437760:
      return '2';
    case 3091726080:
      return '3';
    case 3141861120:
      return '4';
    case 3208707840:
      return '5';
    case 3158572800:
      return '6';
    case 4161273600:
      return '7';
    case 3927310080:
      return '8';
    case 4127850240:
      return '9';
    case 3860463360:
      return '0';
    case 3810328320:
      return 'K';
    default:
      return '\0';
  }
}