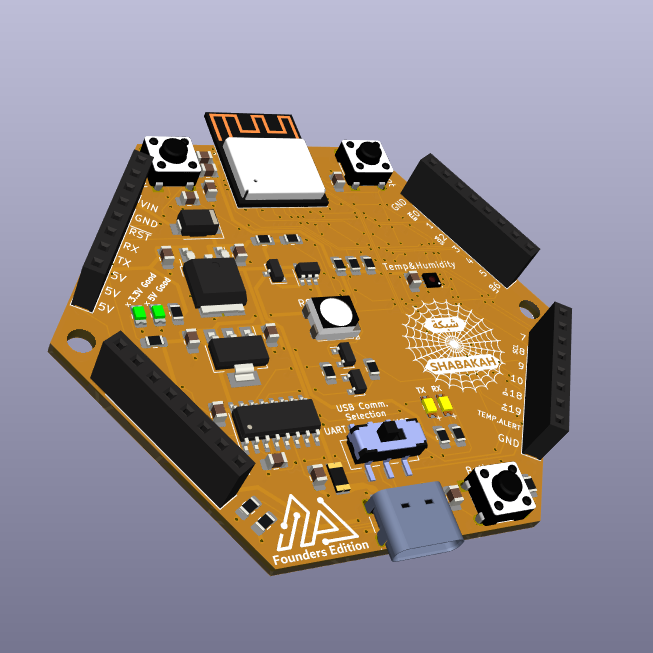
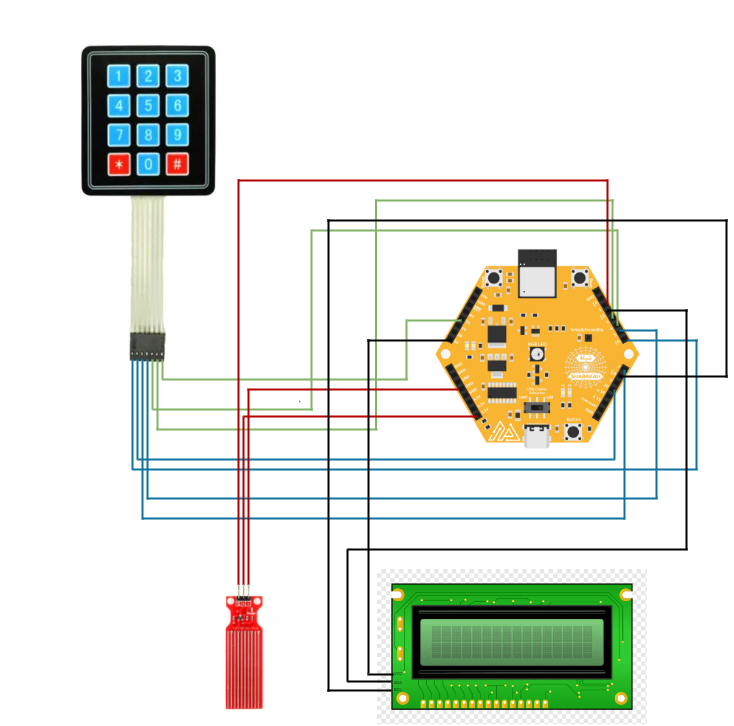
Greetings, everyone! In today’s blog post, we will delve into the realm of designing a keystroke per minute measurement system. The system will be designed with the Shabakah board at the center of the action.
The code for this project is pretty straightforward. It’s written in Arduino. I will add it all below, then explain it in sections.
/**
* @file main.cpp
* @brief Key Typing Game with Keypad and LCD
* @author Zain Kamal, Remal IoT
* @date 12 July 2023
*
* This program implements a key typing game using a keypad and LCD display.
* The user is required to enter a sequence of characters displayed on the LCD,
* and the program measures the user's typing speed in keys per minute (KPM).
* The game has two modes: one where random characters are displayed and the user
* has to type them in order, and another where the user has to type a pre-defined
* sequence of characters.
*/
#include <Wire.h>
#include <Keypad.h>
#include <LiquidCrystal_I2C.h>
#include "Freenove_WS2812_Lib_for_ESP32.h"
// Define the pins
#define COL1 4
#define COL2 3
#define COL3 TX
#define ROW1 6
#define ROW2 10
#define ROW3 7
#define ROW4 5
#define SIGNAL_PIN 1
#define NUM_LEDS 1 // Number of LED
#define CHANNEL 0 // RMT channel
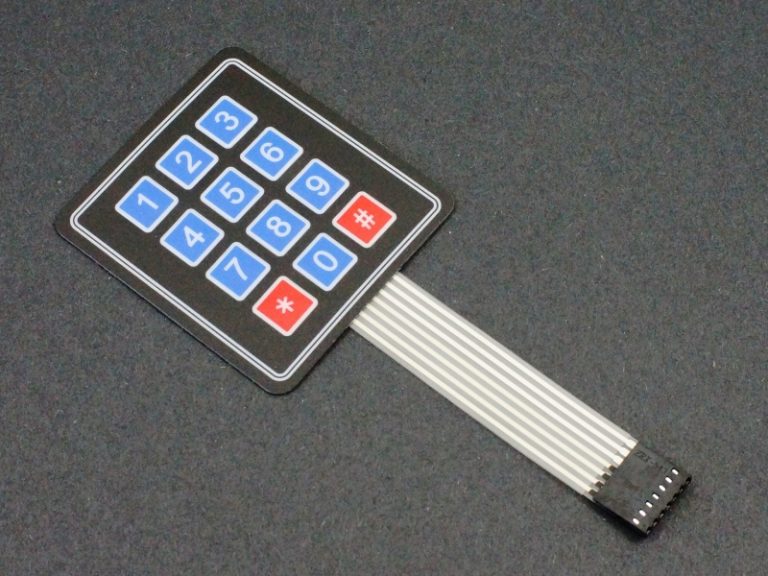
/**************************************************Initialize Keypad*****************************************************/
const byte ROWS = 4; // Four rows
const byte COLS = 3; // Three columns
char keys[ROWS][COLS] = { // Keypad character mapping
{ '1', '2', '3' },
{ '4', '5', '6' },
{ '7', '8', '9' },
{ '*', '0', '#' }
};
byte rowPins[ROWS] = { ROW1, ROW2, ROW3, ROW4 }; // Connect to the row pinouts of the keypad
byte colPins[COLS] = { COL1, COL2, COL3 }; // Connect to the column pinouts of the keypad
Keypad keypad = Keypad(makeKeymap(keys), rowPins, colPins, ROWS, COLS);
LiquidCrystal_I2C lcd(0x27, 16, 2);
/**************************************************Initialize Keypad*****************************************************/
char array[12] = { '1', '2', '3', '4', '5', '6', '7', '8', '9', '0', '*', '#' }; // Initialize the characters array
char str[17] = " "; // Initialize the random characters printed by LCD
String typedSTR = ""; // Initialize the characters typed by the user
char key; // The character typed by the user at a specific time
float kpm = 0.0; // The value of key per minute
unsigned long start_time = 0.0; // The starting time used to measure the duration the user took to type all the characters
unsigned long finish_time = 0.0; // The finishing time used to measure the duration the user took to type all the characters
int water_level = 0;
bool exitLoop = false; // Flag to control loop exit
int currentCharIndex = 0; // Current index of the character to match
int previousCharIndex = -1; // Index of the previously matched character
int16_t LED_Brightness = 30; // Controls LED brightness
Freenove_ESP32_WS2812 Shabakah_RGBLED = Freenove_ESP32_WS2812(NUM_LEDS, LED_BUILTIN, CHANNEL, TYPE_GRB); // Create RGBLED object
/**
* @brief Initialize the program and setup necessary components.
*/
void setup() {
pinMode(SHBK_BTN, INPUT); // Setting shabakah button as input
Serial.begin(9600); // Initializing the serial monitor
pinMode(ROW1, INPUT); // Setting row1 as input to not interfere with built-in LED
lcd.init(); // Initializing the LCD
lcd.backlight(); // Turn on the backlight of the LCD
lcd.setCursor(0, 0); // Set the cursor position to the first row, first column
lcd.print("Press button to"); // Print the message "Press button to" on the LCD
lcd.setCursor(0, 1); // Set the cursor position to the second row, first column
lcd.print("Start"); // Print the message "Start" on the LCD
/* Initialize RGB LED */
Shabakah_RGBLED.begin(); // Begin the RGB LED operation
Shabakah_RGBLED.setBrightness(LED_Brightness); // Set the brightness of the RGB LED
}
/**
* @brief The main program loop.
*/
void loop() {
// Check if the shabakah button is pressed
if (digitalRead(SHBK_BTN)) {
water_level = analogRead(SIGNAL_PIN); // Read the water level from the analog pin
Serial.println(water_level); // Print the water level to the serial monitor
typedSTR = ""; // Reset the typed string and the characters array
for (int i = 0; i < 16; i++)
str[i] = ' ';
lcd.clear(); // Clear the LCD display
if (water_level < 1000) { // Check the water level to determine the game mode
Shabakah_RGBLED.setLedColorData(0, 0, 255, 0); // Set the RGB LED color to green
Shabakah_RGBLED.show(); // Update the RGB LED
// Generate random characters for the LCD display
for (int i = 0; i < 16; i++) {
str[i] = array[random(12)];
}
lcd.setCursor(0, 0); // Set the cursor position to the first row, first column
lcd.print(str); // Print the random characters on the LCD
lcd.setCursor(0, 1); // Set the cursor position to the second row, first column
start_time = millis(); // Record the starting time
// Read the user's key presses and update the LCD display
for (int j = 0; j < 16; j++) {
key = keypad.getKey(); // Get the pressed key
if (key) {
lcd.setCursor(j, 1); // Move cursor to the current position in the second row
lcd.print(key); // Display the pressed key
typedSTR += key; // Append the key to the typed string
}
}
} else {
Shabakah_RGBLED.setLedColorData(0, 255, 0, 0); // Set the RGB LED color to red
Shabakah_RGBLED.show(); // Update the RGB LED
exitLoop = false; // Reset the exit loop flag
start_time = millis(); // Record the starting time
// Main game loop for typing predefined characters
while (!exitLoop) {
lcd.setCursor(0, 0); // Set the cursor position to the first row, first column
// Update characters after the current index
for (int i = currentCharIndex; i < 16; i++) {
key = keypad.getKey(); // Get the pressed key
if (key) {
lcd.setCursor(currentCharIndex, 1); // Set cursor to the position in the second row
lcd.print(key); // Display the pressed key
typedSTR += key; // Append the key to the typed string
if (typedSTR[currentCharIndex] == str[currentCharIndex]) {
previousCharIndex = currentCharIndex; // Update the previous character index
currentCharIndex++; // Move to the next character
}
if (currentCharIndex == 16) { // All characters matched
exitLoop = true;
}
}
}
}
// Reset variables and prepare for the next game
currentCharIndex = 0;
previousCharIndex = -1;
}
// Check if the typed string matches the characters array
if (typedSTR == str) {
finish_time = millis(); // Record the finishing time
unsigned long duration = finish_time - start_time; // Calculate the duration in seconds
float seconds = (duration / 1000.0);
kpm = (16 / seconds) * 60; // Calculate the typing speed in KPM
lcd.clear(); // Clear the LCD display
lcd.print("KPM : "); // Print the label "KPM :" on the LCD
lcd.setCursor(0, 1); // Set the cursor position to the second row, first column
lcd.print(kpm); // Print the typing speed on the LCD
} else {
lcd.clear(); // Clear the LCD display
lcd.setCursor(0, 0); // Set the cursor position to the first row, first column
lcd.print("Press button to"); // Print the message "Press button to" on the LCD
lcd.setCursor(0, 1); // Set the cursor position to the second row, first column
lcd.print("Start"); // Print the message "Start" on the LCD
}
}
}
We start with the headers, these are libraries needed to get the project working:
					#include <Wire.h>
#include <Keypad.h>
#include <LiquidCrystal_I2C.h>
#include "Freenove_WS2812_Lib_for_ESP32.h"
The lines below contain defines used throughout the project. It is good practice to always capitalize your defines:
					// Define the pins
#define COL1 4
#define COL2 3
#define COL3 TX
#define ROW1 6
#define ROW2 10
#define ROW3 7
#define ROW4 5
#define SIGNAL_PIN 1
#define NUM_LEDS 1                                           // Number of LED
#define CHANNEL 0                                            // RMT channel
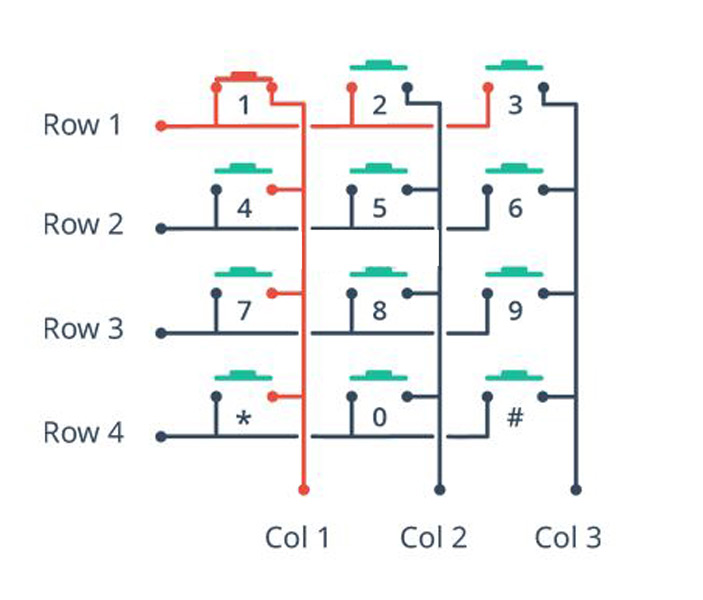
The code below is required to initialize the keypad, aka define the pins used for row and column.
					/**************************************************Initialize Keypad*****************************************************/

const byte ROWS = 4;                                         // Four rows
const byte COLS = 3;                                         // Three columns
char keys[ROWS][COLS] = {                                    // Keypad character mapping
  { '1', '2', '3' },
  { '4', '5', '6' },
  { '7', '8', '9' },
  { '*', '0', '#' }
};

byte rowPins[ROWS] = { ROW1, ROW2, ROW3, ROW4 };             // Connect to the row pinouts of the keypad
byte colPins[COLS] = { COL1, COL2, COL3 };                   // Connect to the column pinouts of the keypad

Keypad keypad = Keypad(makeKeymap(keys), rowPins, colPins, ROWS, COLS);
LiquidCrystal_I2C lcd(0x27, 16, 2);

/**************************************************Initialize Keypad*****************************************************/
The global variables used in this project:
					char array[12] = { '1', '2', '3', '4', '5', '6', '7', '8', '9', '0', '*', '#'};  // Initialize the characters array
char str[17] = "                ";                           // Initialize the random characters printed by LCD
String typedSTR = "";                                        // Initialize the characters typed by the user
char key;                                                    // The character typed by the user at a specific time
float kpm = 0.0;                                             // The value of key per minute
unsigned long start_time = 0.0;                              // The starting time used to measure the duration the user took to type all the characters
unsigned long finish_time = 0.0;                             // The finishing time used to measure the duration the user took to type all the characters
int water_level = 0;
bool exitLoop = false;                                       // Flag to control loop exit
int currentCharIndex = 0;                                    // Current index of the character to match
int previousCharIndex = -1;                                  // Index of the previously matched character
int16_t LED_Brightness = 30;                                 // Controls LED brightness
The code below is used to initalise the LED inside the Shabakah board.
Freenove_ESP32_WS2812 Shabakah_RGBLED = Freenove_ESP32_WS2812(NUM_LEDS, LED_BUILTIN, CHANNEL, TYPE_GRB); // Create RGBLED object
In this section, we’ll be setting up our project. The first step is to configure the pins on Shabakah. We set the pin connected to the
built-in button as an input so that we can use the button functionality. Similarly, we set the pin connected to the LED as an output to avoid any issues.
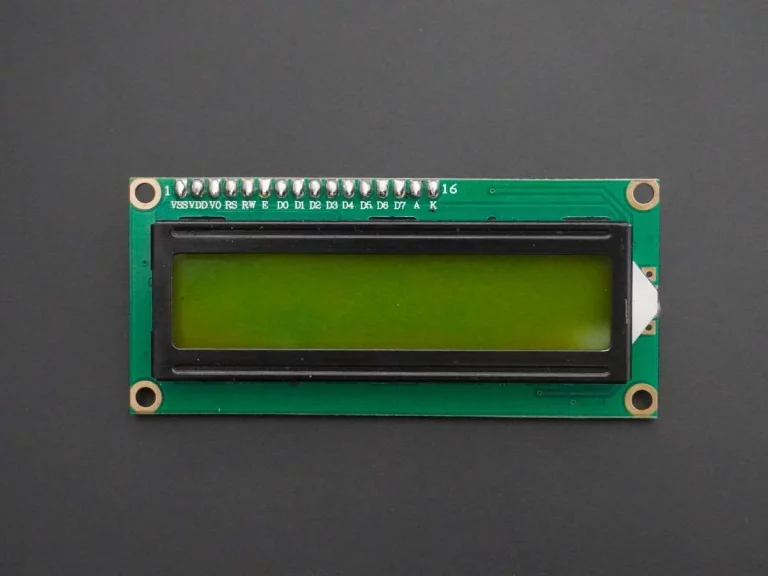
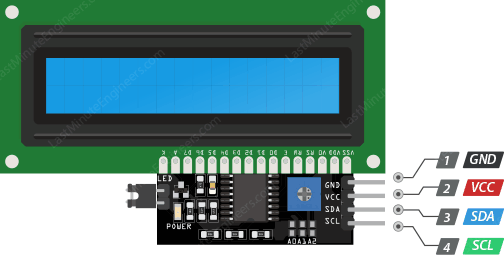
After setting up the pins, we initialize the LCD module. We make sure that the backlight is turned on to ensure good visibility. Finally, we display some text on the LCD screen. This initialization step prepares our project for further interactions and operations.
					/**
 * @brief Initialize the program and setup necessary components.
 */
void setup() {
  pinMode(SHBK_BTN, INPUT);                                   // Setting shabakah button as input
  Serial.begin(9600);                                         // Initializing the serial monitor
  pinMode(ROW1, INPUT);                                       // Setting row1 as input to not interfere with built-in LED

  lcd.init();                                                 // Initializing the LCD
  lcd.backlight();                                            // Turn on the backlight of the LCD
  lcd.setCursor(0, 0);                                        // Set the cursor position to the first row, first column
  lcd.print("Press button to");                               // Print the message "Press button to" on the LCD
  lcd.setCursor(0, 1);                                        // Set the cursor position to the second row, first column
  lcd.print("Start");                                         // Print the message "Start" on the LCD

  /* Initialize RGB LED */
  Shabakah_RGBLED.begin();                                    // Begin the RGB LED operation
  Shabakah_RGBLED.setBrightness(LED_Brightness);              // Set the brightness of the RGB LED
}
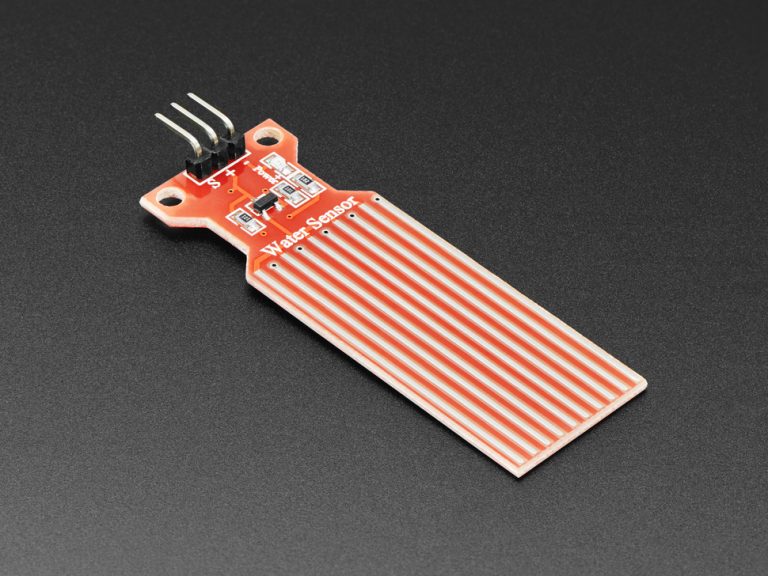
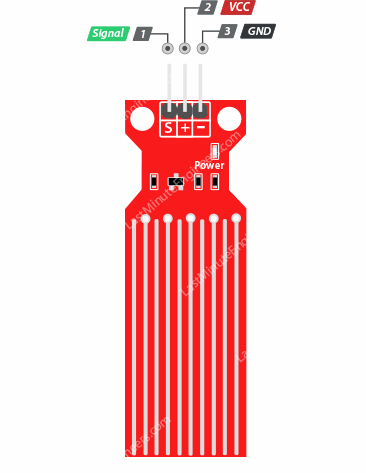
In the loop function, the initial code segment checks whether the user has pressed the Shabakah in-built button. The system will only proceed once the user has pressed the button. After that, the water level is read using the water sensor, and the variable that stores the user’s typed string is reset.
					void loop() {
  // Check if the shabakah button is pressed
  if (digitalRead(SHBK_BTN)) {

    water_level = analogRead(SIGNAL_PIN);                     // Read the water level from the analog pin
    Serial.println(water_level);                              // Print the water level to the serial monitor

    typedSTR = "";                                            // Reset the typed string and the characters array
    for (int i = 0; i < 16; i++)
      str[i] = ' ';

    lcd.clear();
The system operates based on the readings obtained from a water sensor. When the output value from the water sensor is below 1000, the system switches to easy mode, and the starting time is recorded. In this mode, the LCD screen generates a random character sequence once. Following that, the system continuously monitors the user’s input through a keypad. Once the user enters a 16-character sequence, the KPM calculation section will be executed.
					if (water_level < 1000) {                                 // Check the water level to determine the game mode

      Shabakah_RGBLED.setLedColorData(0, 0, 255, 0);          // Set the RGB LED color to green
      Shabakah_RGBLED.show();                                 // Update the RGB LED

      // Generate random characters for the LCD display
      for (int i = 0; i < 16; i++) {
        str[i] = array[random(12)];
      }

      lcd.setCursor(0, 0);                                    // Set the cursor position to the first row, first column
      lcd.print(str);                                         // Print the random characters on the LCD
      lcd.setCursor(0, 1);                                    // Set the cursor position to the second row, first column

      start_time = millis();                                  // Record the starting time

      // Read the user's key presses and update the LCD display
      for (int j = 0; j < 16; j++) {
        key = keypad.getKey();
        while (!key) {
          key = keypad.getKey();
        }

        typedSTR += key;                                      // Append the key to the typed string

        lcd.setCursor(0, 1);                                  // Set the cursor position to the second row, first column
        lcd.print(typedSTR);                                  // Print the typed string on the LCD
      }
    }
When the output of the water sensor reaches or exceeds 1000, the system selects the hard level, initiates a loop, and the starting time is recorded. The loop continues until the user enters 16 characters, at which point the exit condition is triggered. It’s important to note that a character will only count if it matches one of the dynamically changing characters displayed on the LCD. Once the loop is exited, all variables are reset to prepare for the next game.
					else if (1000 <= water_level) {

      Shabakah_RGBLED.setLedColorData(0, 255, 0, 0);          // Set the RGB LED color to red
      Shabakah_RGBLED.show();                                 // Update the RGB LED
      exitLoop = false;                                       // Reset the exit loop flag
      start_time = millis();                                  // Record the starting time

      // Main game loop for typing predefined characters
      while (!exitLoop) {

        lcd.setCursor(0, 0);                                  // Set the cursor position to the first row, first column
        // Update characters after the current index
        for (int i = currentCharIndex; i = 16) {
              exitLoop = true;
            }
          }
        }
      }

      // Reset variables and prepare for the next game
      currentCharIndex = 0;
      previousCharIndex = -1;
    }
Finally, once the user has finished typing all the letters, the program will record the finishing time and will compare the entered text with the text displayed on the LCD. If they are similar, the program proceeds to calculate the Keystrokes Per Minute (KPM) using the formula: KPM = (16 / seconds) * 60.
					if (typedSTR == str) {

      finish_time = millis();                                   // Record the finishing time

      unsigned long duration = finish_time - start_time;        // Calculate the duration in seconds
      float seconds = (duration / 1000);

      kpm = (16 / seconds) * 60;                                // Calculate the typing speed in KPM

      lcd.clear();                                              // Clear the LCD display
      lcd.print("KPM : ");                                      // Print the label "KPM :" on the LCD
      lcd.setCursor(0, 1);                                      // Set the cursor position to the second row, first column
      lcd.print(kpm);                                           // Print the typing speed on the LCD

    } else {

      lcd.clear();                                              // Clear the LCD display
      lcd.setCursor(0, 0);                                      // Set the cursor position to the first row, first column
      lcd.print("Press button to");                             // Print the message "Press button to" on the LCD
      lcd.setCursor(0, 1);                                      // Set the cursor position to the second row, first column
      lcd.print("Start");                                       // Print the message "Start" on the LCD
    }
  }