Learning how to use embedded systems and IoT devices to come up with solutions to everyday problems is useful. Depending on the project’s end goal, it could be very simple or very complex. This post showcases how the Atlas board can be used to quickly come up with a prototype.
Keeping track of the number of people entering a building, store, or passing through a certain area is a useful metric to know.
That number could be used to decide how to improve the area. Maybe the area gets a lot of people passing through, so better amenities are needed. Or maybe a store gets very busy at a certain time of day and needs more staff members. It helps uncover certain insights about a location or store that were not known before.
I was approached by an entity that wanted a device that could count the number of people walking along a track. They needed this number to know what the busy hours are, what areas to focus on improving and for general reporting. This device was planned to be used more widely if the concept could be tested and proven. It all sounds good so far. However, they only gave me two days to come up with a solution. Of course, that is not enough time to come up with a robust solution. A prototype? Sure. Luckily, I had an Atlas v1 board ready to be used. Which is exactly the point of it – a board to quickly build prototypes on.
Atlas v1 comes with an SD card slot, RGB LED, accelerometer, and temperature/humidity sensors built in. It also provides a large area to solder components as needed.
From Atlas we could use the SD card and RGB LED. However, we still need a way to actually sense and count people passing. I didn’t have time to order any new components. Looking through the components I already have, I saw an ultrasonic sensor. I have previously used ultrasonic sensors in different projects for object detection and obstacle avoidance. I knew it was a decent choice for prototyping purposes.
I soldered on headers and wires on the Atlas board to have a place for quick and easy attachment of the ultrasonic sensor. Plus, an additional place for a Bluetooth module. The Bluetooth module’s only purpose is for remote debugging and log output. It’s not needed but very useful to have.
In summary, here’s what you’ll need:
With the tools needed ready, I had to first convey what I was planning to do in a simple way, so I came up with this extremely high-quality animated PowerPoint slide to convey the idea:

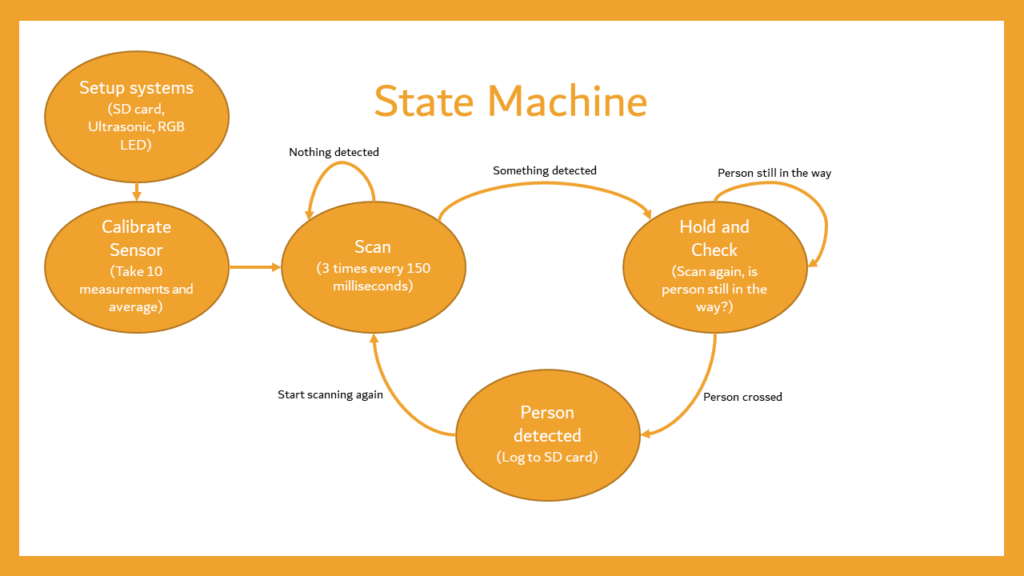
Once the idea is laid out and makes technical sense, I like to create another diagram before starting to code. And that is a state machine diagram. You might not always need to draw a state machine diagram, but for this project, thinking using a state machine is useful.
A state machine diagram is simply a diagram that showcases how the code logic will flow depending on what’s currently happening in the system. It’s used as a basis for the state machine code. I find it really useful to do that, as opposed to starting out by writing code directly and trying to figure out the logic on the fly. Yeah, you can definitely do it without a state machine, but a state machine will allow you to write cleaner code and make it a lot easier to convey how your code works to other people. Plus, it’s less prone to errors and ambiguous states.
Here is the state machine diagram that I used as a foundation for my code logic:
The code for this project is pretty straightforward. It’s written in Arduino. I will add it all below, then explain it in sections. Note: I use the PlatformIO extension on Visual Studio Code, hence the “#include Arduino.h”. Click here to skip the explanation and go directly to downloads🥴
					//<!-- Standard includes -->
#include <stdint.h>

//<!-- Arduino includes -->
#include <Arduino.h>
#include <SoftwareSerial.h>
#include <SPI.h>
#include <SD.h>

//<!-- My includes -->
#include "REMAL_Arduino_Logger.hpp"
#include "REMAL_UltrasonicMB_EZ0.hpp"


/*#####################################
 * Atlas Board Defines
 *####################################*/
//SPI
#define PIN_MOSI            PB2
#define PIN_MISO            PB3
#define PIN_SCK             PB1

//SD Card
#define PIN_SD_CHIPSELECT   7

//RGB LED
#define PIN_LED_RED         13
#define PIN_LED_GREEN       11
#define PIN_LED_BLUE        5


/***************************************
 * Defines
 ***************************************/
#define LOG_MSG                     RML_Arduino_LogMsg  //Shorthand for the logger function. To disable logging, just leave this define blank
#define STARTUP_DELAY_MS            1000U               //Startup delay before running the actual code and allowing things to settle (hardware)

//BT Logger
#define BT_RX_PIN                   0U
#define BT_TX_PIN                   8U
#define BT_BAUDRATE                 9600

//Ultrasonic
#define ULTRASONIC_1_PW_PIN         A0
#define ULTRASONIC_1_RX_PIN         A1

#define MAX_DISTANCE_CM             300.00             //Maximum ultrasonic read distance for project operation
#define MIN_DISTANCE_CM             100.00             //Minimum ultrasonic read distance for project operation


/***************************************
 * Enumerations
 ***************************************/
//Defines the state machine
typedef enum
{
	e_StateMachine_Scan,
	e_StateMachine_Hold,
	e_StateMachine_PersonDetected
} PeopleCounter_StateMachine_Enum;


/***************************************
 * Globals
 ***************************************/
RML_MB_Ultrasonic Ultrasonic1(ULTRASONIC_1_PW_PIN, ULTRASONIC_1_RX_PIN);        //Ultrasonic sensor init

float MaxDistance = 0;                                  //Stores the max distance read by the ultrasonic sensor
float CurrDistance = 0;                                 //The current sensor reading
uint32_t PeopleCount = 0;                               //Used to keep track of the number of people passing
uint8_t CurrState = e_StateMachine_Scan;                //Used to keep tack of where we are in the state machine
float SomeLeeway = 8.00;                                //Value used to give someleeway around MaxDistance. Plus and minus (±)

//SD card
File LogFile;


/***************************************
 * Functions
 ***************************************/
/*******************************************************************************************************
 * @brief BruhError... catches our shortcomings..
 *
 * @param
 * 			None
 *
 * @return
 * 			None
 *******************************************************************************************************/
void BruhError()
{
    /* Init Pin 13 LED (if it wasn't already) */
    pinMode(PIN_LED_RED, OUTPUT);

    digitalWrite(PIN_LED_RED, 0);
    digitalWrite(PIN_LED_GREEN, 0);
    digitalWrite(PIN_LED_BLUE, 0);

    while(1)
    {
        digitalWrite(PIN_LED_RED, 1);
        delay(1000);
        digitalWrite(PIN_LED_RED, 0);
        delay(1000);
    }
}


void setup()
{
    /* Init logger */
    RML_Arduino_LoggerInit(BT_RX_PIN, BT_TX_PIN, BT_BAUDRATE);

    /* Init LEDs */
    pinMode(PIN_LED_RED, OUTPUT);
    pinMode(PIN_LED_GREEN, OUTPUT);
    pinMode(PIN_LED_BLUE, OUTPUT);

    digitalWrite(PIN_LED_BLUE, HIGH);

    /* Init SD card */
    if( !SD.begin(PIN_SD_CHIPSELECT) )
    {
        LOG_MSG("main", e_FATAL, "Could not init SD card");
        BruhError();
    }
    else
    {
        LOG_MSG("main", e_INFO, "SD card init successfully!");
    }

    /* Create log file if it does not exist already */
    LogFile = SD.open("log.txt", FILE_WRITE);
    if(LogFile)
    {
        LogFile.println("########### Power On ###########");
        LogFile.close();
    }
    else
    {
        LOG_MSG("SD", e_ERROR, "Could not open 'log.txt'");
    }

    //#### Sensor Calibration ####
    /*
     * 1- Wait after startup - make sure everything is settled
     */
    LOG_MSG("main", e_INFO, "Waiting %u ms for things to settle", STARTUP_DELAY_MS);
    delay(STARTUP_DELAY_MS);

    /*
     * 2- Calibrate the max distance by taking 10 measurements and averaging them for accuracy
     */
    LOG_MSG("main", e_INFO, "Starting calibration procedure");
    for(uint8_t i = 0; i < 10; i++)
    {
        MaxDistance = (MaxDistance + Ultrasonic1.GetDistance_in_cm());                  //Get reading
        delay(50);                                                                      //Sensor can only measure every 49.5 ms
    }
    MaxDistance = MaxDistance/10.00;                                                    //Get the average
    LOG_MSG("main", e_INFO, "Got MaxDistance to be => %f cm", MaxDistance);

    /*
     * 3- If the max distance is above 300cm (3m), then set MaxDistance to 300 cm as the
     *    EZ0 Ultrasonic does not really work further than 3 meters
     */
    if(MAX_DISTANCE_CM < MaxDistance)
    {
        LOG_MSG("main", e_WARNING, "Ultrasonic MaxDistance [%f cm] is above max range of [%f cm]", MaxDistance, MAX_DISTANCE_CM);
        LOG_MSG("main", e_WARNING, "Setting Ultrasonic MaxDistance to be 300 cm");
        MaxDistance = MAX_DISTANCE_CM;
    }

    /* 4- Error handling:
     *    Check if there is enough distance to operate properly */
    if(MaxDistance < MIN_DISTANCE_CM)
    {
        LOG_MSG("main", e_FATAL, "Got MaxDistance to be below min of %f cm => %f cm", MIN_DISTANCE_CM, MaxDistance);
        BruhError();
    }

    /* Project running */
    digitalWrite(PIN_LED_GREEN, HIGH);
    digitalWrite(PIN_LED_BLUE, LOW);
}


void loop()
{
    /* Simple state machine (due to the limitations of the EZ0 ultrasonic) */
    switch (CurrState)
    {
        case e_StateMachine_Scan:
            CurrDistance = 0;                                                           //Clear variable
            for(uint8_t i = 0; i < 3; i++)                                              //Scan 3 times
            {
                CurrDistance = ( CurrDistance + Ultrasonic1.GetDistance_in_cm() );
            }
            CurrDistance = CurrDistance/3.00;                                           //Average

            LOG_MSG("StateMachine_Scan", e_DEBUG, "Running, CurrDistance => %f cm", CurrDistance);

            if( !(CurrDistance >= (MaxDistance-SomeLeeway)) && (CurrDistance <= (MaxDistance+SomeLeeway)) )   //Check if something is detected within a range and not close to the max distance (accounting for sensor errors)
            {
                    CurrState = e_StateMachine_Hold;
                    LOG_MSG("StateMachine_Scan", e_DEBUG, "Got distance [%f cm] => Moving to Hold", CurrDistance);

            }
            break;


        case e_StateMachine_Hold:
            LOG_MSG("StateMachine_Hold", e_DEBUG, "Running");

            CurrDistance = 0;                                                           //Clear variable
            for(uint8_t i = 0; i < 3; i++)                                              //Scan 3 times
            {
                CurrDistance = ( CurrDistance + Ultrasonic1.GetDistance_in_cm() );
            }
            CurrDistance = CurrDistance/3.00;                                           //Average

            if( !(CurrDistance >= (MaxDistance-SomeLeeway)) && (CurrDistance <= (MaxDistance+SomeLeeway)) )   //Check again if something is detected within a range and not close to the max distance (accounting for sensor errors)
            {
                CurrState = e_StateMachine_Hold;
                LOG_MSG("StateMachine_Hold", e_DEBUG, "Person still there [%f cm], keep hodling", CurrDistance);

            }
            else
            {
                CurrState = e_StateMachine_PersonDetected;                                                  //Person crossed, change state
                LOG_MSG("StateMachine_Hold", e_DEBUG, "Person not there, Moving to PersonDetected state");
            }
            break;

            case e_StateMachine_PersonDetected:
            LOG_MSG("StateMachine_PersonDetected", e_DEBUG, "Running");
            PeopleCount = PeopleCount + 1;                                              //Increment people counter

            LogFile = SD.open("log.txt", FILE_WRITE);                                   //Log to SD card
            if(LogFile)
            {
                LogFile.print("> Person spotted - Total: ");
                LogFile.println(PeopleCount);
                LogFile.close();
            }
            else
            {
                LOG_MSG("SD", e_ERROR, "Could not open 'log.txt'");
            }

            LOG_MSG("StateMachine_PersonDetected", e_INFO, "Person spotted! Total count => %u", PeopleCount);
            LOG_MSG("StateMachine_PersonDetected", e_DEBUG, "Moving to Scan state");
            CurrState = e_StateMachine_Scan;                                            //Move back to Scan state
            break;

        default:
            LOG_MSG("State Machine", e_FATAL, "Never should've come here...");
            BruhError();
    }
}
We start with the headers, these are libraries needed to get the project working:
					//<!-- Standard includes -->
#include <stdint.h>

//<!-- Arduino includes -->
#include <Arduino.h>
#include <SoftwareSerial.h>
#include <SPI.h>
#include <SD.h>

//<!-- My includes -->
#include "REMAL_Arduino_Logger.hpp"
#include "REMAL_UltrasonicMB_EZ0.hpp"
I like to prefix Remal’s custom libraries with “REMAL_”. For this blog post, we won’t go into what “REMAL_Arduino_Logger.hpp” does. It won’t even be needed. At the end of the blog post, you’ll find a link to download this project. The project will not have calls that use Remal’s logger library. I want to cover logging in its own post in the future and dive deeper into it.
The lines below contain defines used throughout the project. It is good practice to always capitalize your defines:
					/*#####################################
 * Atlas Board Defines
 *####################################*/
//SPI
#define PIN_MOSI            PB2
#define PIN_MISO            PB3
#define PIN_SCK             PB1

//SD Card
#define PIN_SD_CHIPSELECT   7

//RGB LED
#define PIN_LED_RED         13
#define PIN_LED_GREEN       11
#define PIN_LED_BLUE        5


/***************************************
 * Defines
 ***************************************/
#define LOG_MSG                     RML_Arduino_LogMsg  //Shorthand for the logger function. To disable logging, just leave this define blank
#define STARTUP_DELAY_MS            1000U               //Startup delay before running the actual code and allowing things to settle (hardware)

//BT Logger
#define BT_RX_PIN                   0U
#define BT_TX_PIN                   8U
#define BT_BAUDRATE                 9600

//Ultrasonic
#define ULTRASONIC_1_PW_PIN         A0
#define ULTRASONIC_1_RX_PIN         A1

#define MAX_DISTANCE_CM             300.00             //Maximum ultrasonic read distance for project operation
#define MIN_DISTANCE_CM             100.00             //Minimum ultrasonic read distance for project operation
The enumeration below defines what states our state machine can go into. I like to prefix any enumerations with “e_”:
					/***************************************
 * Enumerations
 ***************************************/
//Defines the state machine
typedef enum
{
	e_StateMachine_Scan,
	e_StateMachine_Hold,
	e_StateMachine_PersonDetected
} PeopleCounter_StateMachine_Enum;
The global variables used in this project:
					/***************************************
 * Globals
 ***************************************/
RML_MB_Ultrasonic Ultrasonic1(ULTRASONIC_1_PW_PIN, ULTRASONIC_1_RX_PIN);        //Ultrasonic sensor init

float MaxDistance = 0;                                  //Stores the max distance read by the ultrasonic sensor
float CurrDistance = 0;                                 //The current sensor reading
uint32_t PeopleCount = 0;                               //Used to keep track of the number of people passing
uint8_t CurrState = e_StateMachine_Scan;                //Used to keep tack of where we are in the state machine
float SomeLeeway = 8.00;                                //Value used to give someleeway around MaxDistance. Plus and minus (±)

//SD card
File LogFile;
Every system needs an error-catching function. There are many ways to indicate an error, and I chose to create BruhError() and call it whenever a fault in the system occurs. It simply keeps blinking a red LED, indicating a fatal error:
					/*******************************************************************************************************
 * @brief BruhError... catches our shortcomings..
 *
 * @param
 * 			None
 *
 * @return
 * 			None
 *******************************************************************************************************/
void BruhError()
{
    /* Init Pin 13 LED (if it wasn't already) */
    pinMode(PIN_LED_RED, OUTPUT);

    digitalWrite(PIN_LED_RED, 0);
    digitalWrite(PIN_LED_GREEN, 0);
    digitalWrite(PIN_LED_BLUE, 0);

    while(1)
    {
        digitalWrite(PIN_LED_RED, 1);
        delay(1000);
        digitalWrite(PIN_LED_RED, 0);
        delay(1000);
    }
}
Here we initialize and setup our project. The main thing we do is turn the RGB LED to blue, which indicates the system is starting up, then initialize the SD card and create a log file to store the number of people.
Any calls to “LOG_MSG()” are for debugging purposes, so I can see the output on my phone via the Bluetooth module shown above in this post:
					void setup()
{
    /* Init logger */
    RML_Arduino_LoggerInit(BT_RX_PIN, BT_TX_PIN, BT_BAUDRATE);

    /* Init LEDs */
    pinMode(PIN_LED_RED, OUTPUT);
    pinMode(PIN_LED_GREEN, OUTPUT);
    pinMode(PIN_LED_BLUE, OUTPUT);

    digitalWrite(PIN_LED_BLUE, HIGH);

    /* Init SD card */
    if( !SD.begin(PIN_SD_CHIPSELECT) )
    {
        LOG_MSG("main", e_FATAL, "Could not init SD card");
        BruhError();
    }
    else
    {
        LOG_MSG("main", e_INFO, "SD card init successfully!");
    }

    /* Create log file if it does not exist already */
    LogFile = SD.open("log.txt", FILE_WRITE);
    if(LogFile)
    {
        LogFile.println("########### Power On ###########");
        LogFile.close();
    }
    else
    {
        LOG_MSG("SD", e_ERROR, "Could not open 'log.txt'");
    }
Next, we simply setup the ultrasonic sensor and calibrate it according to the environment it’s placed in. Then change the RGB LED to green to indicate that the project is currently operational and is good to go. Comments below should suffice to explain what’s going on.
					    //#### Sensor Calibration ####
    /*
     * 1- Wait after startup - make sure everything is settled
     */
    LOG_MSG("main", e_INFO, "Waiting %u ms for things to settle", STARTUP_DELAY_MS);
    delay(STARTUP_DELAY_MS);

    /*
     * 2- Calibrate the max distance by taking 10 measurements and averaging them for accuracy
     */
    LOG_MSG("main", e_INFO, "Starting calibration procedure");
    for(uint8_t i = 0; i < 10; i++)
    {
        MaxDistance = (MaxDistance + Ultrasonic1.GetDistance_in_cm());                  //Get reading
        delay(50);                                                                      //Sensor can only measure every 49.5 ms
    }
    MaxDistance = MaxDistance/10.00;                                                    //Get the average
    LOG_MSG("main", e_INFO, "Got MaxDistance to be => %f cm", MaxDistance);

    /*
     * 3- If the max distance is above 300cm (3m), then set MaxDistance to 300 cm as the
     *    EZ0 Ultrasonic does not really work further than 3 meters
     */
    if(MAX_DISTANCE_CM < MaxDistance)
    {
        LOG_MSG("main", e_WARNING, "Ultrasonic MaxDistance [%f cm] is above max range of [%f cm]", MaxDistance, MAX_DISTANCE_CM);
        LOG_MSG("main", e_WARNING, "Setting Ultrasonic MaxDistance to be 300 cm");
        MaxDistance = MAX_DISTANCE_CM;
    }

    /* 4- Error handling:
     *    Check if there is enough distance to operate properly */
    if(MaxDistance < MIN_DISTANCE_CM)
    {
        LOG_MSG("main", e_FATAL, "Got MaxDistance to be below min of %f cm => %f cm", MIN_DISTANCE_CM, MaxDistance);
        BruhError();
    }

    /* Project running */
    digitalWrite(PIN_LED_GREEN, HIGH);
    digitalWrite(PIN_LED_BLUE, LOW);
}
And now to the loop() function and the state machine within it. The state machine is just a fancy switch statement. We have 4 states defined:
> e_StateMachine_Scan
> e_StateMachine_Hold
> e_StateMachine_PersonDetected
> default
We start with e_StateMachine_Scan. In this state, we simply keep scanning 3 times every 150 milliseconds. We average them to account for any sensor errors, as the EZ0 ultrasonic sensor isn’t that accurate and prone to false readings. We then check to see if there is an object in the way. If there is no object detected, we loop back to this state again. However, if something is detected, we switch and go into the e_StateMachine_Hold state.
					void loop()
{
    /* Simple state machine (due to the limitations of the EZ0 ultrasonic) */
    switch (CurrState)
    {
        case e_StateMachine_Scan:
            CurrDistance = 0;                                                           //Clear variable
            for(uint8_t i = 0; i < 3; i++)                                              //Scan 3 times
            {
                CurrDistance = ( CurrDistance + Ultrasonic1.GetDistance_in_cm() );
            }
            CurrDistance = CurrDistance/3.00;                                           //Average

            LOG_MSG("StateMachine_Scan", e_DEBUG, "Running, CurrDistance => %f cm", CurrDistance);

            if( !(CurrDistance >= (MaxDistance-SomeLeeway)) && (CurrDistance <= (MaxDistance+SomeLeeway)) )   //Check if something is detected within a range and not close to the max distance (accounting for sensor errors)
            {
                    CurrState = e_StateMachine_Hold;
                    LOG_MSG("StateMachine_Scan", e_DEBUG, "Got distance [%f cm] => Moving to Hold", CurrDistance);

            }
            break;
In the e_StateMachine_Hold state, we take 3 measurements again and average them.
We then check: is the person still in the way? If the person is still in the way, we hold the current state, meaning we simply return to this state and repeat it. However, if we cannot detect a person within the range, it means they have crossed and we move on to the e_StateMachine_PersonDetected state.
        case e_StateMachine_Hold:
            LOG_MSG("StateMachine_Hold", e_DEBUG, "Running");

            CurrDistance = 0;                                                           //Clear variable
            for(uint8_t i = 0; i < 3; i++)                                              //Scan 3 times
            {
                CurrDistance = ( CurrDistance + Ultrasonic1.GetDistance_in_cm() );
            }
            CurrDistance = CurrDistance/3.00;                                           //Average

            if( !(CurrDistance >= (MaxDistance-SomeLeeway)) && (CurrDistance <= (MaxDistance+SomeLeeway)) )   //Check again if something is detected within a range and not close to the max distance (accounting for sensor errors)
            {
                CurrState = e_StateMachine_Hold;
                LOG_MSG("StateMachine_Hold", e_DEBUG, "Person still there [%f cm], keep hodling", CurrDistance);

            }
            else
            {
                CurrState = e_StateMachine_PersonDetected;                                                  //Person crossed, change state
                LOG_MSG("StateMachine_Hold", e_DEBUG, "Person not there, Moving to PersonDetected state");
            }
            break;
In our third major state, e_StateMachine_PersonDetected, we simply update the variable responsible for keeping track of the number of people and write to the log file on the SD card.
					        case e_StateMachine_PersonDetected:
            LOG_MSG("StateMachine_PersonDetected", e_DEBUG, "Running");
            PeopleCount = PeopleCount + 1;                                              //Increment people counter

            LogFile = SD.open("log.txt", FILE_WRITE);                                   //Log to SD card
            if(LogFile)
            {
                LogFile.print("> Person spotted - Total: ");
                LogFile.println(PeopleCount);
                LogFile.close();
            }
            else
            {
                LOG_MSG("SD", e_ERROR, "Could not open 'log.txt'");
            }

            LOG_MSG("StateMachine_PersonDetected", e_INFO, "Person spotted! Total count => %u", PeopleCount);
            LOG_MSG("StateMachine_PersonDetected", e_DEBUG, "Moving to Scan state");
            CurrState = e_StateMachine_Scan;                                            //Move back to Scan state
            break;

        default:
            LOG_MSG("State Machine", e_FATAL, "Never should've come here...");
            BruhError();
    }
}
And finally, the default state. Why do we even have it? Well, it is good practice to always have a default state. It’s a catch-all if anything occurs that causes your state machine to go into an undefined state.
In this simple project, it’s highly unlikely anything will go wrong within our state machine. But for more complex projects, a default case is a must. Or else, you might be chasing a bug for hours without realizing it’s simply an undefined state. Always use default with switch statements!
Here is the Atlas board detecting people in action:
Or view the post on our Instagram page:
With the limited time and resources on hand, coming up with a solution using the Atlas board was practical and functional. But this project is far from perfect.
There are many key areas in which one could improve upon, starting with the ultrasonic sensor itself. It was a pain to work with and easily picked up interference or gave inaccurate readings. I tried to mitigate those issues using software, but more robust hardware is definitely better. Even then, ultrasonic sensors cannot detect two people walking together in the same line as the beams will bounce off the person closest to the sensor only. Better sensors are essential if accurate readings are needed, perhaps by using a camera and a Raspberry Pi?
In any case, let’s break this solution down:
| Pros | Cons |
|---|---|
| Cheap and affordable | Inaccurate |
| Gives us an estimated number of people | Can not detect multiple people in the same line |
| Easy to deploy with the right tools | Need to get outdoor rated ultrasonic sensors |
| A lot of room for fine tuning and improvement based on your own needs | Better more accurate methods exist, like using a camera (but those have their own drawbacks: being expensive and harder to implement) |
This was a fun project to work on and an interesting problem to tackle. As stated, there’s a lot of room for improvement. If you are planning to do something similar, I hope this blog post helps!
Got any comments or feedback? Leave them below!