Shabakah

شبكة

Founders Edition – v3.1

What is Shabakah?

Shabakah is the first development board created by Remal IoT. Shabakah is currently our most powerful and capable board in the lineup! It’s a development board focused on networking and connecting to the internet and other devices by utilizing Wi-Fi and Bluetooth. The name “Shabakah” translates to “web” in Arabic, emphasizing the point of connectivity you get with this board.

Already own a Shabakah board?

What are Shabakah’s features?

  • All new MCU! Gone is the Silicon Labs MGM210PA32JIA. The new Espressif Systems ESP32-C3-MINI is far more capable and easier to use
  • Wi-Fi support – 2.4 GHz (802.11 b/g/n)
  • Bluetooth 5 – Low Energy and Mesh
  • Supports multiple ways to be powered: USB-C or via VIN pin
  • Power pins able to handle up to 1.5A when using USB-C!
  • 15 GPIO pins
  • A switch to control output on USB-C port: UART or native USB (very useful for debugging or creating native USB applications)
  • Addressable RGB LED controlled only by one pin
  • Two free buttons
  • On-board temperature and humidity sensor (unused alert pin broken out)
  • 4 MB flash in chip package
  • Arduino IDE support!
  • Runs on FreeRTOS natively
  • Shabakah v3.1 is ~17% larger than v2
Shabakah Founders Edition (v3.1) Quick Start Guide

Shabakah Pinout Diagram

Shabakah is powered by Espressif Systems ESP32-C3-MINI. It is an extremely capable microcontroller with a lot of customizability regarding pin functionalities. We highly encourage users to check out these resources to get the most out of their Shabakah board:


Shabakah Example Code

Every Shabakah board comes pre-flashed with demo code to showcase some of its features. In this demo code, the RGB LED will cycle through a range of colors. You can use the two buttons (labeled “Boot” and “Button”) to adjust the intensity of the LED brightness. The temperature and humidity sensor will take readings every second and send them via serial output (both USB and UART) to a connected computer. If the humidity reading exceeds 80%, the RGB LED on the Shabakah board will turn red until the humidity falls below this threshold.

You can find the above demo code and more after adding Shabakah to the Arduino IDE, selecting it, and then navigating to “File -> Examples -> Shabakah Founders Edition Examples”

You can explore numerous other examples that showcase amazing capabilities. Although these examples were not written by us, most should work directly. However, some might require adapting the code slightly to make it run correctly on your Shabakah board.

Note: after installing Shabakah from the board manager and selecting it in the Arduino IDE, you can leverage its pre-defined keywords in your projects. These keywords will automatically be substituted with the corresponding values:

				
					LED_BUILTIN             //Shabakah built-in addressable RGB LED pin number (6)

SHBK_BTN                //Shabakah's Button pin number (0) - Pulled-down
SHBK_BTN_BOOT           //Shabakah's Boot Button pin number (9) - Must be pulled-up by software before use

SHBK_I2C_TEMP_ADDR      //The I2C address of the SHT30 sensor (0x44)

TX                      //The TX pin, or you can use the value 21
RX                      //The RX pin, or you can use the value 20

SCL                     //I2C clock line pin number (8)
SDA                     //I2C data line pin number (2)

MOSI                    //SPI Master Out Slave In pin number (6)
MISO                    //SPI Master In Slave Out pin number (5)
SCK                     //SPI clock pin number (4)


Entering Firmware Download Mode

If you disable certain USB functionalities or encounter other issues while working with Shabakah, you may find it unresponsive when you are trying to upload new code. You can fix this by entering “Firmware Download mode.”

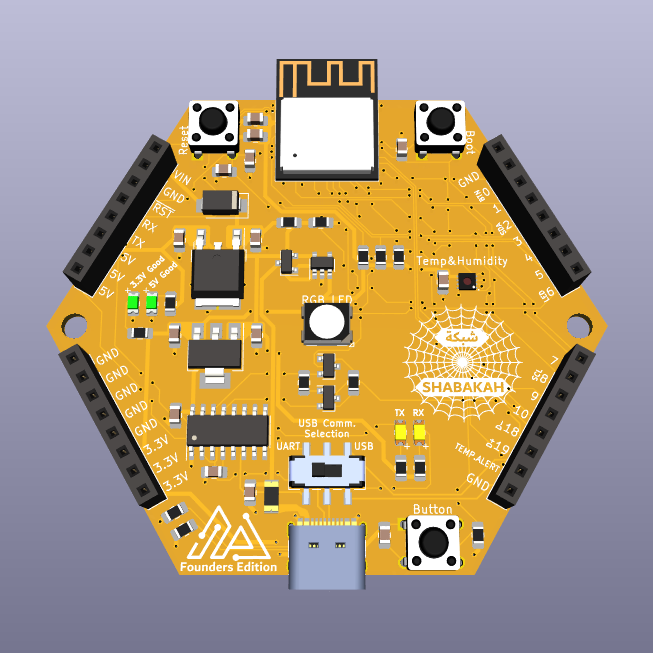
To enter “Firmware Download mode,” simply hold down the Boot button and press the Reset button. This will initiate “Firmware Download mode”

Once you’ve entered “Firmware Download mode” you can release the Boot button and proceed to upload your code via serial through the Arduino IDE. This should resolve any issues you were experiencing with uploading code to your Shabakah board.

CH340 Drivers For Shabakah

Shabakah utilizes the CH340 IC to communicate with your computer through UART. Typically, the CH340 will automatically install when you connect your board to your PC. However, if you encounter any issues, you can try reinstalling the CH340 drivers by downloading them from here:

Shabakah Revisions